Visualization
Important
In the summer/fall of 2025, Delta is transitioning from a RedHat 8 based OS stack to a RedHat 9 based OS stack. During the transition, some nodes will have the “old” RH8 stack, while some nodes will have the new RH9 stack.
There are two different versions of the documentation while this is going on. You are currently looking at pages for the new default RH9 stack. For documentation on the old RH8 stack, go to the Red Hat 8 page.
To see what’s new in Red Hat 9 and what you have to change to transition, please see the Early User Info page.
Delta A40 nodes contain NVIDIA ray tracing cores (RT cores) and also support traditional rasterization graphics.
ParaView
ParaView is an open-source visualization and data analysis tool.
Interactive Use: ParaView in Open OnDemand (OOD)
The ParaView GUI client works via OOD on both CPU and GPU jobs, but interactivity is significantly improved on the latter.
Offline Use: pvbatch
Batch rendering can be achieved with pvbatch. Probably the best way to get started is to use Tools > Start Trace from the main menu in the GUI client to record an interactive session and then edit as needed.
pvbatch the same module for CPU and GPU jobs paraview/6.0.1-prebuilt Inside of a job, use srun and it will automatically use all of the allocated processors. E.g.:
srun pvbatch <myscript.py>
Additional information at: ParaView PvPython and PvBatch wiki
Advanced Interactive Use: ParaView Client-Server Mode
Note
For ParaView client-server connections, you must install the same version of ParaView that is installed on Delta, currently this is 6.0.1.
Start the ParaView client application. (Note, if you are on an ARM processor, you may see a warning about not being able to load the OSPRay plugin which requires x86_64, this can be ignored.)
Start a connection by clicking the Connect icon or navigating to File > Connect.

In the Choose Server Configuration window, click Fetch Servers .
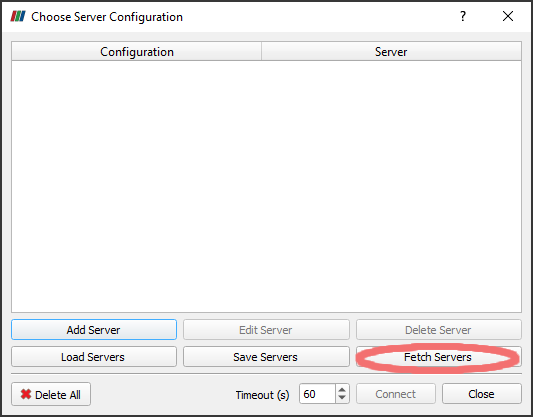
Scroll down and select the NCSA Delta CPU or NCSA Delta GPU profile and click Import Selected.
Note
You must have a GPU allocation for the GPU profile to work.
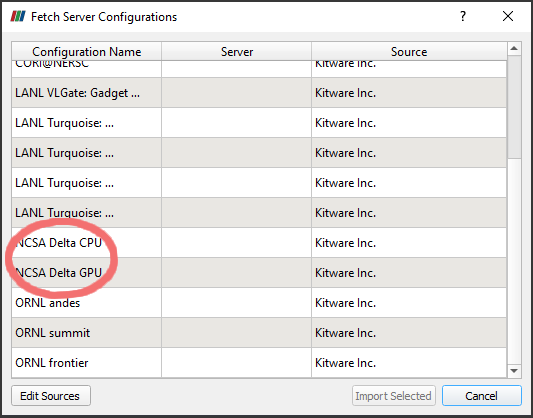
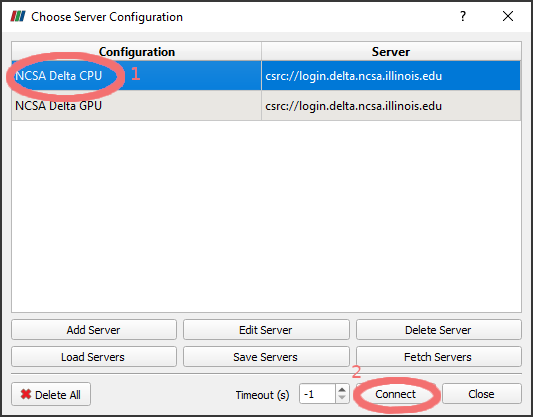
In the Choose Server Configuration window, select the profile and click Connect. This will open a Connection Options window.
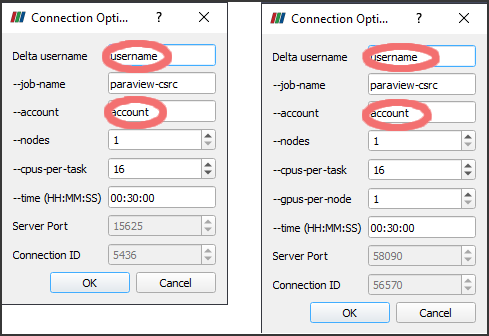
In the Connect Options window, change the options, as appropriate. At a minimum, you need to update:
Delta username - enter your NCSA username that you use to log in to Delta.
--account - enter an account name that you have access to on Delta.
Click OK.
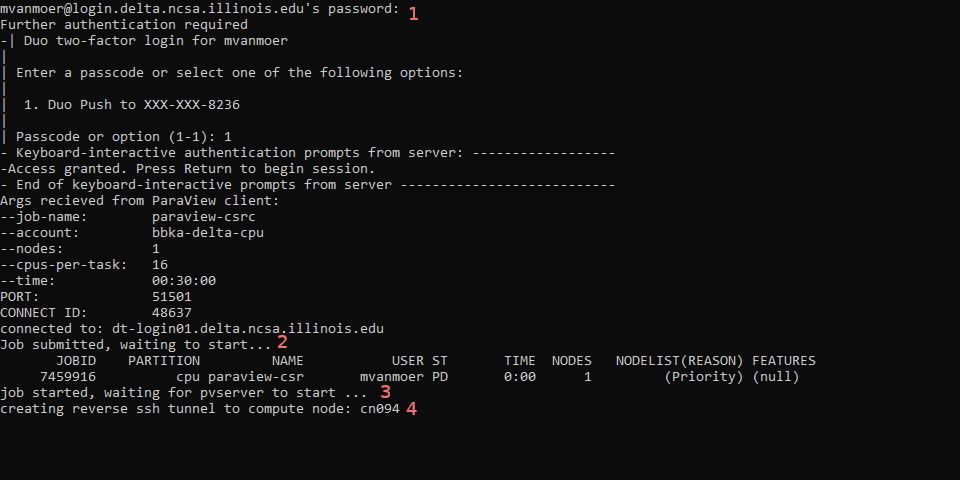
A terminal window will open. This terminal must remain open for the duration of the session. In the terminal:
Authenticate with your NCSA (Kerberos) password and DUO MFA. (1)
A job will be submitted based on the options you entered in the previous step. The job file as well as the SLURM output will be in your home directory. (2)
Messages will appear in the terminal for when the job starts and once the SSH tunnel has been made to pvserver running on the compute node. (3) and (4)
Note
On Windows, if nothing happens at this stage, or if a window opens and immediately closes, try downloading and installing PuTTY and plink.exe.
When the connection is complete, the ParaView client window should change to the default background color, and the pipeline browser should show a csrs:// connection to Delta.

Note
An output window may open with various warnings. These can usually be ignored as long as none of them are labeled “Error.”
Suggestions on Connection Options
ParaView’s server application, pvserver, is a hybrid OpenMP-MPI application. This informs the following advice.
Set
--nodesto 1, unless your data is spatially decomposed into multiple files per timestep. In that case, try setting--nodesto the number of domains. ParaView will not automatically decompose data except for very specific instances. The D3 (data domain decomposition) filter might be able to decompose your data.--cpus-per-taskalso sets the default memory allocation of 1GB per cpu. Increase as necessary, but note that requesting more cores may result in longer queue wait times.For GPU jobs, start with
--gpus-per-nodeat 1, it is likely there will be little to no benefit from using more than one. These jobs are run on thegpuA40x4partition.
VisIt
VisIt is an open-source visualization and data analysis tool.
Interactive Use: VisIt in Open OnDemand (OOD)
The VisIt GUI client works via OOD on both CPU and GPU jobs, but interactivity is improved on the latter.
Offline Use: visit scripts
VisIt can be used for offline, batch rendering using Python scripts:
module load visit
srun visit -np <N> -nowin -cli -s <python script>
Note: it might be necessary to explicitly call sys.exit at the end of the script to prevent VisIt from dropping into a Python interpreter and consuming the remaining time after finishing rendering.
For more details see the Python Scripting section of the VisIt User Manual.
Advanced Interactive Use: VisIt Client-Server Mode
This is currently unsupported.
VTK
VTK Python API
To use the VTK Python API (in order to import vtk), install with pip or conda following the guidance at Installed Software - Python.
VTK C++ API
To build against the VTK C++ API or link to the VTK C++ libs, load the module with: module load vtk. The currently available version is 9.4.0.
PyVista in Jupyter Notebooks
There are three supported ways to use the PyVista Python visualization module on Delta:
Through the Open OnDemand JupyterLab application.
Through a notebook launched in an Open OnDemand XDesktop session.
By connecting to a running, browser-less Open OnDemand Jupyter server via VSCode.
Preparation
On Delta, activate the Python environment you intend to use, if any, and install the following packages via pip:
$ pip3 install jupyterlab pyvista[all]
$ pip3 install trame_jupyter_extension
Notebooks should start by importing the PyVista module and setting an appropriate jupyter backend, e.g.:
import pyvista as pv
pv.set_jupyter_backend('client')
sphere = pv.Sphere()
sphere.plot()
PyVista via a Open OnDemand Jupyter Lab instance
Open a new notebook using the environment in which PyVista was installed, or by choosing the appropriate kernel for an existing notebook.
Set the jupyter backend to client.
PyVista in a Jupyter notebook during an Open OnDemand XDesktop session
Open a Terminal and load any relevant modules or virtual environments.
Launch a notebook with:
$ jupyter-lab
This should open a Firefox browser with a JupyterLab session.
The jupyter backend can be set to client, server, or trame.
Connect via VSCode
Connect to Delta over SSH from inside VSCode and install the Jupyter and Python extensions on Delta.
Open a new VSCode Terminal and load any relevant modules and environments.
Do steps (1) and (2) from the previous example.
Launch a browser-less JupyterLab with:
$ jupyter-lab --no-browser --ip=0.0.0.0
Use the XDesktop clipboard app to copy the first URL

Follow these VSCode instruction to connect to a remote Jupyter server, pasting in the URL copied in the previous step.
The jupyter backend must be either html or static.
