Running Jobs
Accessing the Compute Nodes
Delta implements the Slurm batch environment to manage access to the compute nodes. Use the Slurm commands to run batch jobs or for interactive access (an “interactive job”) to compute nodes. See the Slurm quick start guide for an introduction to Slurm. There are multiple ways to access compute nodes on Delta.
Batch scripts (
sbatch) or Interactive (srun,salloc), which is right for me?sbatch: Use batch scripts for jobs that are debugged, ready to run, and don’t require interaction. Sample Slurm batch job scripts are provided in the Sample Scripts section. For mixed resource heterogeneous jobs see the Slurm job support documentation. Slurm also supports job arrays for easy management of a set of similar jobs, see the Slurm job array documentation for more information.
srun:
srunwill run a single command through Slurm on a compute node.srunblocks, it will wait until Slurm has scheduled compute resources, and when it returns, the job is complete.sruncan be used to launch a shell to get interactive access to compute node(s), this is an “interactive job”. The one thing you can’t do in an interactive job created bysrunis to run srun commands; if you want to do that, usesalloc.salloc: Also interactive, use
sallocwhen you want to reserve compute resources for a period of time and interact with them using multiple commands. Each command you type after yoursallocsession begins will run on the login node if it is just a normal command, or on your reserved compute resources if prefixed withsrun. Typeexitwhen finished with asallocallocation if you want to end it before the time expires.
Open OnDemand provides compute node access via JupyterLab, VSCode Code Server, and the noVNC Desktop virtual desktop.
Direct
sshaccess to a compute node in a running job is enabled once the job has started. See also, Monitoring a Node During a Job. In the following example, JobID 12345 is running on node cn001$ squeue --job jobid JOBID PARTITION NAME USER ST TIME NODES NODELIST(REASON) 12345 cpu bash gbauer R 0:17 1 cn001Then in a terminal session:
$ ssh cn001
cn001.delta.internal.ncsa.edu (172.28.22.64)
  OS: RedHat 8.4   HW: HPE   CPU: 128x    RAM: 252 GB
  Site: mgmt  Role: compute
$
Partitions (Queues)
Delta Partitions/Queues
Partition/Queue |
Node Type |
Max Nodes per job |
Max Duration |
Max Running in Queue/user |
Charge Factor |
|---|---|---|---|---|---|
cpu |
CPU |
ALL |
48 hr |
TBD |
1.0 |
cpu-interactive |
CPU |
4 |
1 hr |
TBD |
2.0 |
cpu-preempt |
CPU |
ALL |
48 hr |
TBD |
0.5 |
gpuA100x4* (* this is the default queue, but submit jobs to gpuA100x4) |
quad-A100 |
ALL |
48 hr |
TBD |
1.0 |
gpuA100x4-interactive |
quad-A100 |
4 |
1 hr |
TBD |
2.0 |
gpuA100x4-preempt |
quad-A100 |
ALL |
48 hr |
TBD |
0.5 |
gpuA100x8 |
octa-A100 |
ALL |
48 hr |
TBD |
1.5 |
gpuA100x8-interactive |
octa-A100 |
2 |
1 hr |
TBD |
3.0 |
gpuH200x8 |
octa-H200 |
1 |
48 hr |
TBD |
3.0 |
gpuH200x8-interactive |
octa-H200 |
1 |
1 hr |
TBD |
6.0 |
gpuA40x4 |
quad-A40 |
ALL |
48 hr |
TBD |
0.5 |
gpuA40x4-interactive |
quad-A40 |
4 |
1 hr |
TBD |
1.0 |
gpuA40x4-preempt |
quad-A40 |
ALL |
48 hr |
TBD |
0.25 |
gpuMI100x8 |
octa-MI100 |
ALL |
48 hr |
TBD |
0.25 |
gpuMI100x8-interactive |
octa-MI100 |
ALL |
1 hr |
TBD |
0.5 |
(Note: ALL in the “Max Nodes per job” column means you can assign up to the number of nodes int that partition.)
Delta Production Default Partition Values
Property |
Value |
|---|---|
Default Memory per core |
1000 MB |
Default Wall-clock time |
30 minutes |
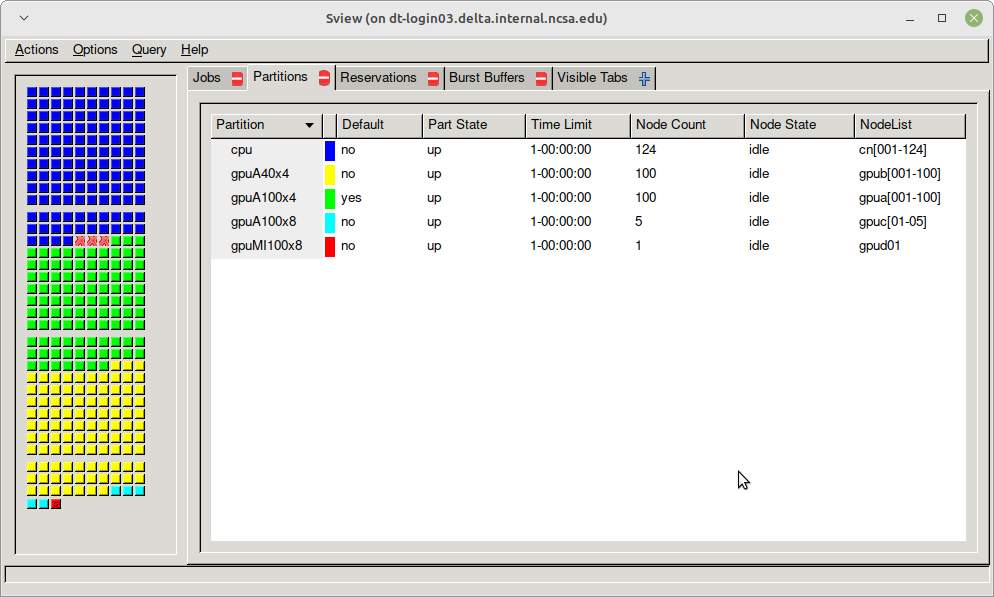
sview
Use sview for a GUI of the partitions. See the Slurm - sview documentation for more information.
Job and Node Policies
The default job requeue or restart policy is set to not allow jobs to be automatically requeued or restarted (as of 12/19/2022). To enable automatic requeue and restart of a job by Slurm, please add the following Slurm directive:
--requeue
When a job is requeued due to an event like a node failure, the batch script is initiated from its beginning. Job scripts need to be written to handle automatically restarting from checkpoints.
Node-sharing is the default for jobs. Node-exclusive mode can be obtained by specifying all the consumable resources for that node type or adding the following Slurm options:
--exclusive --mem=0
GPU NVIDIA MIG (GPU slicing) for the A100 is not supported at this time.
Preemptible Queues
Warning
Preemptible queues are only recommended for jobs that include checkpointing.
If your job code doesn’t include checkpointing, then submitting the job to a preempt queue could result in your job being preempted without saved progress/results.
Preemptible queues are available on Delta. See Partitions (Queues) for the partition names, max durations, and charge factors.
On Delta, jobs are allotted a minimum of 10 minutes (PreemptExemptTime), plus 5 minutes of GraceTime if the job has a SIGTERM handler.
Slurm Configuration for Preempt Queues
# PreemptExemptTime is 10 minutes, so preempt jobs will always get to run at least 10 minutes
$ scontrol show config | grep PreemptExemptTime
PreemptExemptTime       = 10:00:00

# GraceTime is 5 minutes (300s), a job can potentially run that
# much longer if it handles SIGTERM on its own. SIGKILL arrives at least 5 minutes later.
$ scontrol show partition cpu-preempt | grep -i grace
 DefaultTime=00:30:00 DisableRootJobs=YES ExclusiveUser=NO GraceTime=300 Hidden=NO
What Happens When a Job Gets Preempted
A preempting job (job-B) is allocated resources currently in use by the soon-to-be preempted job (job-A)
Has job-A run for at least 10 minutes (PreemptExemptTime)?
If yes, continue to step 3.
If no, continue to step 3 after the 10 minutes has elapsed.
job-A receives SIGTERM and SIGCONT.
5 minutes later (Delta’s GraceTime setting on the partition), job-A receives another SIGTERM and SIGCONT plus SIGKILL (SIGKILL cannot be handled or caught). SIGKILL is sent after SIGTERM and SIGCONT, but you can’t rely on a specific time delay after these signals.
Preempted Job Example (click to expand/collapse)
The example uses the bbka-delta-gpu account. Accounts available to you are listed under “Project” when you run the accounts command.
[arnoldg@dt-login04 bin]$ cat trap.sh
#!/bin/bash

trap "echo The script received SIGINT" SIGINT
trap "echo The script received SIGTERM" SIGTERM
trap "echo The script received SIGCONT" SIGCONT
trap "echo The script received SIGQUIT" SIGQUIT
trap "echo The script received SIGUSR1" SIGUSR1
trap "echo The script received SIGUSR2" SIGUSR2

while true
do
    let "i=i+1"
    echo "waiting for signals, $i minutes ..."
    sleep 1m
done

 ### I'm in a salloc preempt partition job shell here:
 + salloc --mem=16g --nodes=1 --ntasks-per-node=1 --cpus-per-task=2 --partition=gpu-slingshot11-preempt --account=bbka-delta-gpu --time=00:30:00 --gpus-per-node=1
salloc: Granted job allocation 608
salloc: Waiting for resource configuration
salloc: Nodes gpub003 are ready for job

[arnoldg@dt-login04 bin]$ time srun ./trap.sh
waiting for signals, 1 minutes ...
waiting for signals, 2 minutes ...
### I queued a normal priority job at this time stamp, but the preempt job is guaranteed 10 minutes by PreemptExemptTime
waiting for signals, 3 minutes ...
waiting for signals, 4 minutes ...
waiting for signals, 5 minutes ...
waiting for signals, 6 minutes ...
waiting for signals, 7 minutes ...
waiting for signals, 8 minutes ...
waiting for signals, 9 minutes ...
waiting for signals, 10 minutes ...
slurmstepd: error: *** STEP 608.0 ON gpub003 CANCELLED AT 2023-09-15T12:22:07 ***
The script received SIGTERM
The script received SIGCONT
waiting for signals, 11 minutes ...
waiting for signals, 12 minutes ...
waiting for signals, 13 minutes ...
waiting for signals, 14 minutes ...
waiting for signals, 15 minutes ...
salloc: Job allocation 608 has been revoked.
srun: forcing job termination
srun: Job step aborted: Waiting up to 32 seconds for job step to finish.
srun: forcing job termination
[arnoldg@dt-login04 bin]$ The script received SIGTERM
The script received SIGCONT
waiting for signals, 16 minutes ...
srun: error: gpub003: task 0: Killed

[arnoldg@dt-login04 bin]$
Preemption References
There are many online resources to learn more about preemption, checkpointing, signals, and traps; here are a few to get you started.
Batch Jobs
Batch jobs are submitted through a job script (as in the Sample Scripts) using the sbatch command.
Job scripts generally start with a series of Slurm directives that describe requirements of the job, such as number of nodes and wall time required, to the batch system/scheduler. The rest of the batch script consists of user commands. See Sample Scripts for example batch job scripts.
sbatch
Slurm directives can also be specified as options on the sbatch command line; command line options take precedence over those in the script.
The syntax for sbatch is: sbatch [list of sbatch options] script_name. Refer to the sbatch man page for detailed information on the options.
$ sbatch tensorflow_cpu.slurm
Submitted batch job 2337924
$ squeue -u $USER
          JOBID PARTITION     NAME     USER ST       TIME  NODES NODELIST(REASON)
        2337924 cpu-inter    tfcpu  mylogin  R       0:46      1 cn006
Useful Batch Job Environment Variables
Description |
Slurm Environment Variable |
Detail Description |
|---|---|---|
Array JobID |
$SLURM_ARRAY_JOB_ID $SLURM_ARRAY_TASK_ID |
Each member of a job array is assigned a unique identifier. |
Job Submission Directory |
$SLURM_SUBMIT_DIR |
By default, jobs start in the directory that the job was submitted
from. So the |
JobID |
$SLURM_JOB_ID |
Job identifier assigned to the job. |
Machine(node) list |
$SLURM_NODELIST |
Variable name that contains the list of nodes assigned to the batch job. |
See the sbatch man page for additional environment variables available.
Interactive Jobs
Interactive jobs can be implemented in several ways, depending on what is needed.
The following examples start up a bash shell terminal on a CPU or GPU node.
(Replace account_name with one of your available accounts; these are listed under “Project” when you run the accounts command.)
Single core with 16GB of memory, with one task on a CPU node
srun --account=account_name --partition=cpu-interactive \
  --nodes=1 --tasks=1 --tasks-per-node=1 \
  --cpus-per-task=4 --mem=16g \
  --pty bash
Single core with 20GB of memory, with one task on a A40 GPU node
srun --account=account_name --partition=gpuA40x4-interactive \
  --nodes=1 --gpus-per-node=1 --tasks=1 \
  --tasks-per-node=16 --cpus-per-task=1 --mem=20g \
  --pty bash
Note
For large, compute intensive compilations consider compiling your code on a compute node where you can get more power than on the shared login nodes. You can use srun to start an interactive job which will start a shell on a compute node with access to your files.
srun
The srun command initiates an interactive job or process on compute nodes.
For example, the following command will run an interactive job in the gpuA100x4 or gpuA40x4 partition with a wall-clock time limit of 30 minutes, using one node and 16 cores per node and 1 GPU.
(Replace account_name with one of your available accounts; these are listed under “Project” when you run the accounts command.)
srun -A account_name --time=00:30:00 --nodes=1 --ntasks-per-node=16 \
--partition=gpuA100x4,gpuA40x4 --gpus=1 --mem=16g --pty /bin/bash
After entering the command, wait for Slurm to start the job. As with any job, an interactive job is queued until the specified number of nodes is available. Specifying a small number of nodes for smaller amounts of time should shorten the wait time because such jobs will backfill among larger jobs. You will see something like this:
$ srun --mem=16g --nodes=1 --ntasks-per-node=1 --cpus-per-task=4 \
--partition=gpuA100x4-interactive,gpuA40x4-interactive --account=account_name \
--gpus-per-node=1 --time=00:30:00 --x11 --pty /bin/bash
[login_name@gpua022 bin]$  #<-- note the compute node name in the shell prompt
[login_name@gpua022 bin]$ echo $SLURM_JOB_ID
2337913
[login_name@gpua022 ~]$ c/a.out 500
count=500
sum= 0.516221
[login_name@gpua022 ~]$ exit
exit
$
When finished, use the exit command to end the bash shell on the compute resource and hence the Slurm srun job.
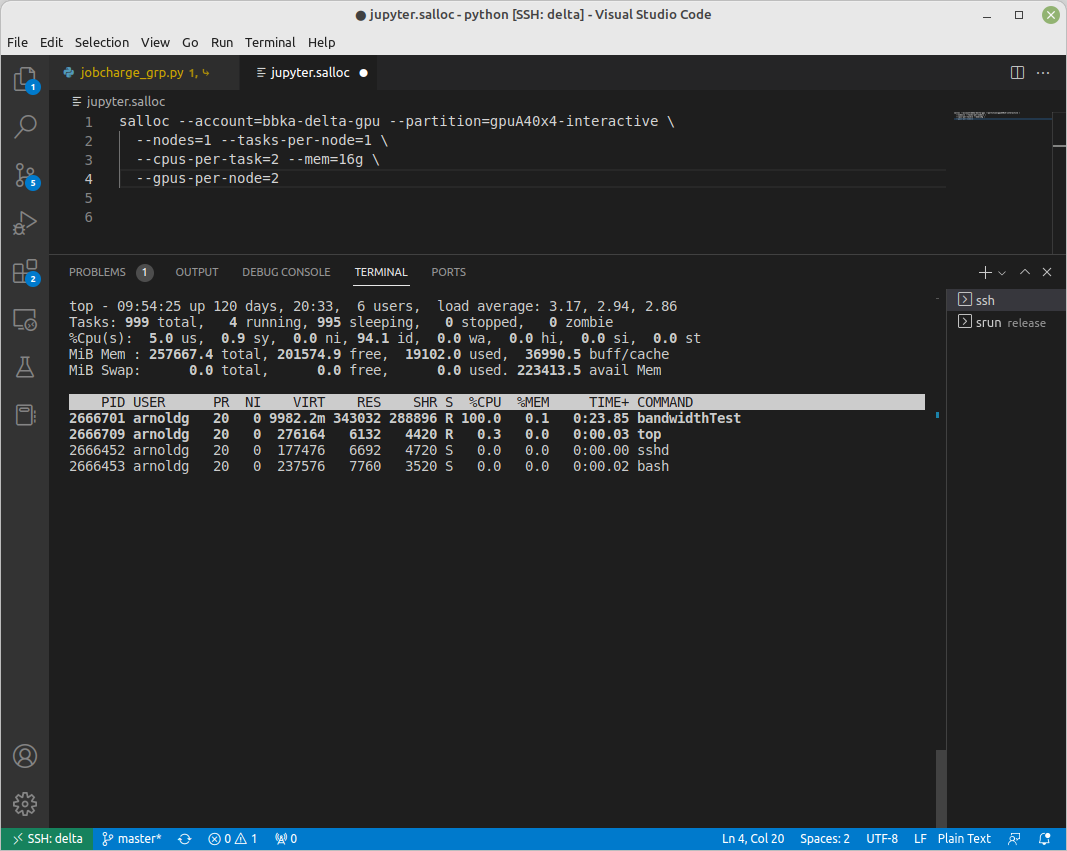
salloc
While being interactive like srun, salloc allocates compute resources for you, while leaving your shell on the login node.
Run commands on the login node as usual, use exit to end an salloc session early, and use srun with no extra flags to launch processes on the compute resources. (Replace account_name with one of your available accounts; these are listed under “Project” when you run the accounts command.)
$ salloc --mem=16g --nodes=1 --ntasks-per-node=1 --cpus-per-task=2 \
  --partition=gpuA40x4-interactive,gpuA100x4-interactive \
  --account=account_name --time=00:30:00 --gpus-per-node=1
salloc: Pending job allocation 2323230
salloc: job 2323230 queued and waiting for resources
salloc: job 2323230 has been allocated resources
salloc: Granted job allocation 2323230
salloc: Waiting for resource configuration
salloc: Nodes gpub073 are ready for job
$ hostname #<-- on the login node
dt-login03.delta.ncsa.illinois.edu
$ srun bandwidthTest --htod #<-- on the compute resource, honoring your salloc settings
CUDA Bandwidth Test - Starting...
Running on...

Device 0: NVIDIA A40
Quick Mode

Host to Device Bandwidth, 1 Device(s)
PINNED Memory Transfers
Transfer Size (Bytes)        Bandwidth(GB/s)
32000000                     24.5

Result = PASS
$ exit
salloc: Relinquishing job allocation 2323230
MPI Interactive Jobs: Use salloc Followed by srun
Interactive jobs are already a child process of srun, therefore, one cannot srun (or mpirun) applications from within them.
Within standard batch jobs submitted via sbatch, use srun to launch MPI codes.
For true interactive MPI, use salloc in place of srun shown above, then “srun my_mpi.exe” after you get a prompt from salloc (exit to end the salloc interactive allocation).
interactive MPI, salloc and srun (click to expand/collapse)
(Replace account_name with one of your available accounts; these are listed under “Project” when you run the accounts command.)
[arnoldg@dt-login01 collective]$ cat osu_reduce.salloc
salloc --account=account_name --partition=cpu-interactive \
  --nodes=2 --tasks-per-node=4 \
  --cpus-per-task=2 --mem=0

[arnoldg@dt-login01 collective]$ ./osu_reduce.salloc
salloc: Pending job allocation 1180009
salloc: job 1180009 queued and waiting for resources
salloc: job 1180009 has been allocated resources
salloc: Granted job allocation 1180009
salloc: Waiting for resource configuration
salloc: Nodes cn[009-010] are ready for job
[arnoldg@dt-login01 collective]$ srun osu_reduce

# OSU MPI Reduce Latency Test v5.9
# Size       Avg Latency(us)
4                       1.76
8                       1.70
16                      1.72
32                      1.80
64                      2.06
128                     2.00
256                     2.29
512                     2.39
1024                    2.66
2048                    3.29
4096                    4.24
8192                    2.36
16384                   3.91
32768                   6.37
65536                  10.49
131072                 26.84
262144                198.38
524288                342.45
1048576               687.78
[arnoldg@dt-login01 collective]$ exit
exit
salloc: Relinquishing job allocation 1180009
[arnoldg@dt-login01 collective]$
Interactive X11 Support
To run an X11 based application on a compute node in an interactive session, the use of the --x11 switch with srun is needed.
For example, to run a single core job that uses 1G of memory with X11 (in this case an xterm) do the following. (Replace account_name with one of your available accounts; these are listed under “Project” when you run the accounts command.)
srun -A account_name  --partition=cpu-interactive \
  --nodes=1 --tasks=1 --tasks-per-node=1 \
  --cpus-per-task=2 --mem=16g \
  --x11  xterm
File System Dependency Specification for Jobs
NCSA requests that jobs specify the file system or systems being used to enable response to resource availability issues.
All jobs are assumed to depend on the HOME file system. Jobs that do not specify a dependency on WORK (/projects) and SCRATCH (/scratch) will be assumed to depend only on the HOME (/u) file system.
File System |
Feature/Constraint Label |
Note |
|---|---|---|
/projects |
projects |
(same underlying FS as /taiga) |
/work/hdd |
work |
|
IME (/ime) |
ime |
depends on /work/hdd |
TAIGA (/taiga) |
taiga |
(same underlying FS as /projects) |
The Slurm constraint specifier and Slurm Feature attribute for jobs are used to add file system dependencies to a job.
Slurm Feature Specification
For already submitted and pending (PD) jobs, please use the Slurm Feature attribute as follows:
$ scontrol update job=JOBID Features="feature1&feature2"
For example, to add scratch and ime Features to an already submitted job:
$ scontrol update job=713210 Features="scratch&ime"
To verify the setting:
$ scontrol show job 713210 | grep Feature
   Features=scratch&ime DelayBoot=00:00:00
Slurm Constraint Specification
To add Slurm job constraint attributes when submitting a job with sbatch (or with srun as a command line argument) use:
#SBATCH --constraint="constraint1&constraint2.."
For example, to add scratch and ime constraints when submitting a job:
#SBATCH --constraint="scratch&ime"
To verify the setting:
$ scontrol show job 713267 | grep Feature
   Features=scratch&ime DelayBoot=00:00:00
Job Management
squeue/scontrol/sinfo
The squeue, scontrol, and sinfo commands display batch job and partition information. The following table has a list of common commands, see the man pages for other available options.
In squeue results, if the NODELIST(REASON) for a job is MaxGRESPerAccount, the user has exceeded the number of cores or GPUs allotted per user or project for a given partition.
Slurm Command |
Description |
|---|---|
squeue -a
|
Lists the status of all jobs on the system. |
squeue -u $USER
|
Lists the status of all your jobs in the batch system.
Replace |
squeue -j JobID
|
Lists nodes allocated to a running job in addition
to basic information. Replace |
scontrol show job JobID
|
Lists detailed information on a particular job. Replace
|
sinfo -a
|
Lists summary information on all the partition. |
scancel
The scancel command deletes a queued job or terminates a running job. The example below deletes/terminates the job with the associated JobID.
scancel JobID
Using Job Dependency to Stagger Job Starts
When submitting multiple jobs, consider using --dependency to prevent all of the jobs from starting at the same time. Staggering the job startup resource load prevents system slowdowns. This is especially recommended for Python users because multiple jobs that load Python on startup can slow down the system if they are all started at the same time.
From the --dependency man page:
-d, --dependency=<dependency_list>

                 after:job_id[[+time][:jobid[+time]...]]

After the specified jobs start or are cancelled and 'time' in minutes from job start or cancellation happens, this job can begin  execution. If  no 'time' is given then there is no delay after start or cancellation.
The following sample script staggers the start of five jobs by 5 minutes each. You can use this script as a template and modify it to the number of jobs you have. The minimum recommended delay time is 3 minutes; 5 minutes is a more conservative choice.
Sample script that automates the delay dependency (click to expand/collapse)
[gbauer@dt-login01 depend]$ cat start
#!/bin/bash

# this is the time in minutes to have Slurm wait before starting the next job after the previous one started.

export DELAY=5   # in minutes

# submit first job and grab jobid
JOBID=`sbatch testjob.slurm | cut -d" " -f4`
echo "submitted $JOBID"

# loop 4 times submitting a job depending on the previous job to start
for count in `seq 1 4`; do

OJOBID=$JOBID

JOBID=`sbatch --dependency=after:${OJOBID}+${DELAY} testjob.slurm | cut -d" " -f4`

echo "submitted $JOBID with $DELAY minute delayed start from $OJOBID "

done
Here is what the jobs look like when submitting using the above example script:
[gbauer@dt-login01 depend]$ ./start
submitted 2267583
submitted 2267584 with 5 minute delayed start from 2267583
submitted 2267585 with 5 minute delayed start from 2267584
submitted 2267586 with 5 minute delayed start from 2267585
submitted 2267587 with 5 minute delayed start from 2267586
After 5 minutes from the start of the first job, the next job starts, and so on.
[gbauer@dt-login01 depend]$ squeue -u gbauer
         JOBID PARTITION     NAME     USER ST       TIME  NODES NODELIST(REASON)
       2267587 cpu-inter testjob.   gbauer PD       0:00      1 (Dependency)
       2267586 cpu-inter testjob.   gbauer PD       0:00      1 (Dependency)
       2267585 cpu-inter testjob.   gbauer PD       0:00      1 (Dependency)
       2267584 cpu-inter testjob.   gbauer  R       2:14      1 cn093
       2267583 cpu-inter testjob.   gbauer  R       7:21      1 cn093
You can use the sacct command with a specific job number to see how the job was submitted and show the dependency.
[gbauer@dt-login01 depend]$ sacct --job=2267584 --format=submitline -P
SubmitLine
sbatch --dependency=after:2267583+5 testjob.slurm
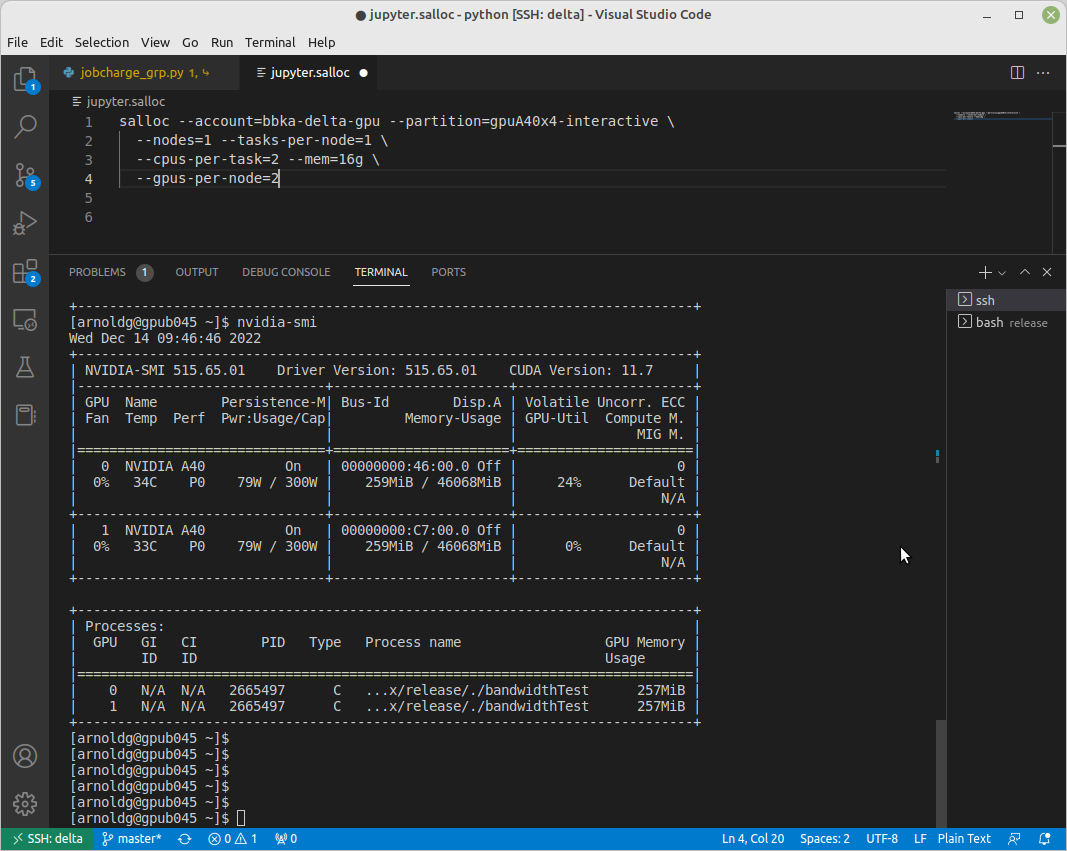
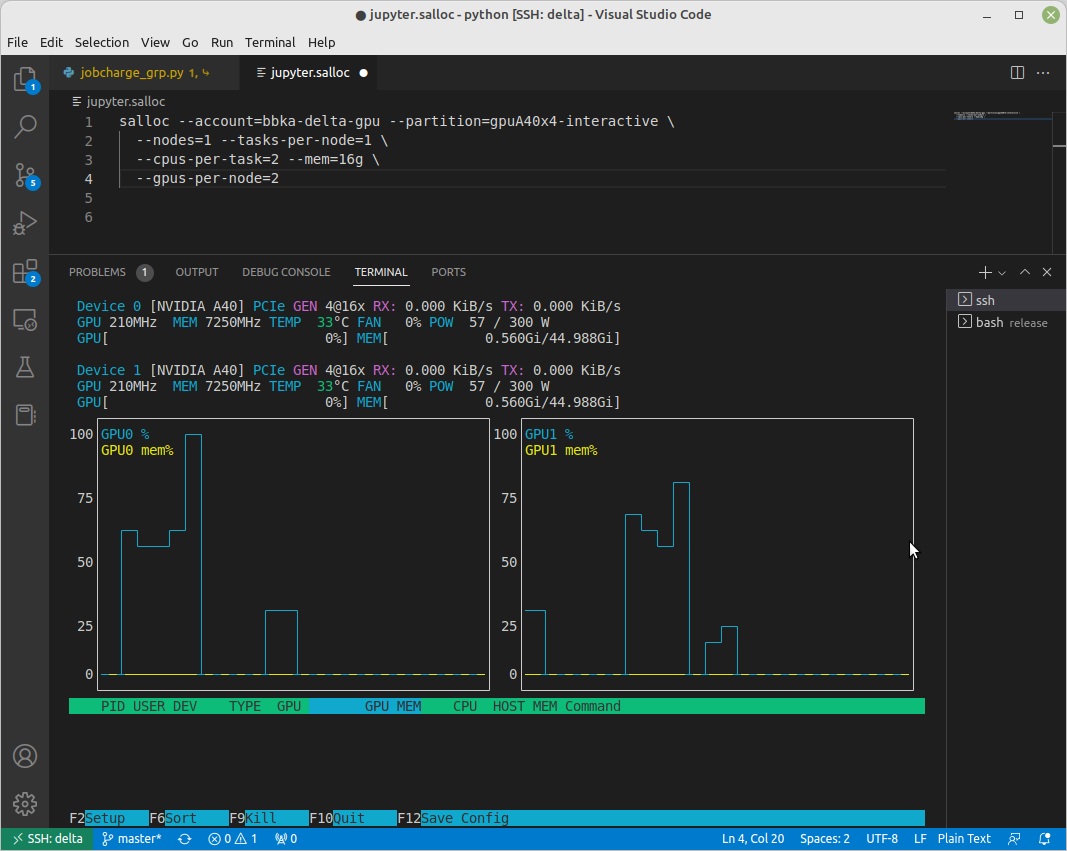
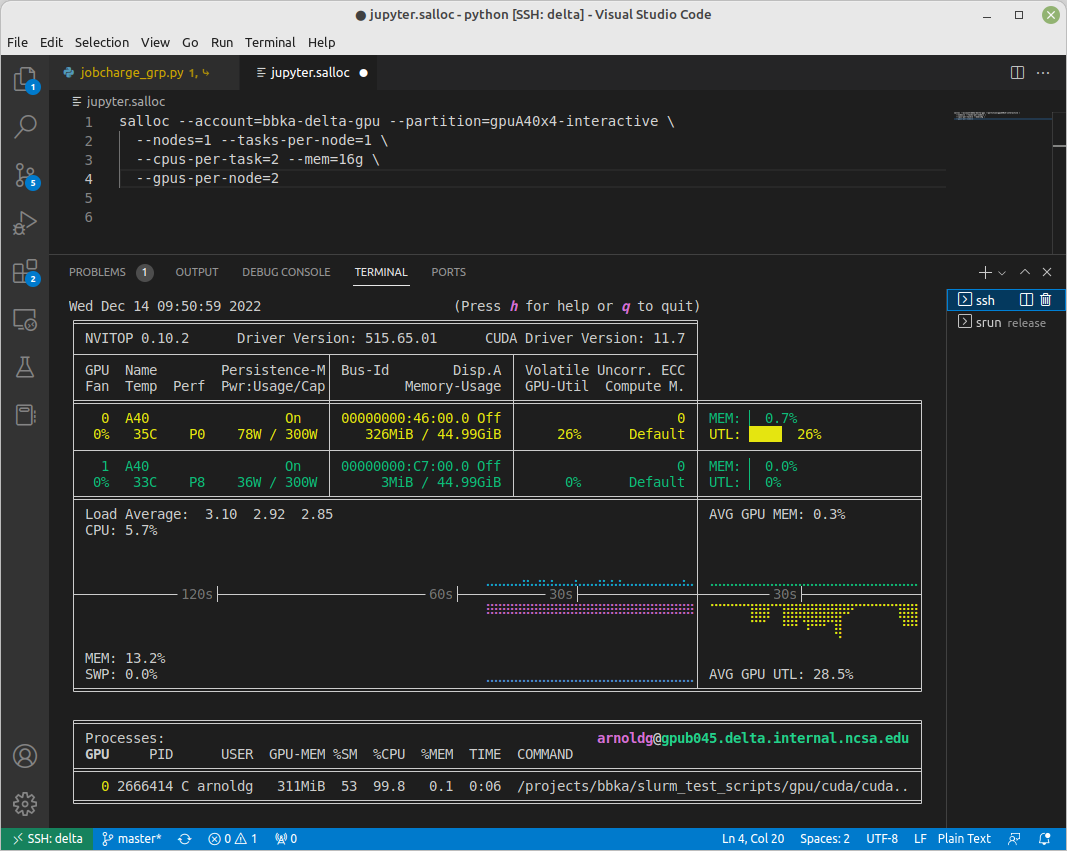
Monitoring a Node During a Job
You have SSH access to nodes in your running job(s). Some of the basic monitoring tools are demonstrated in the example transcript below. Screen shots are appended so that you can see the output from the tools. Most common Linux utilities are available from the compute nodes (free, strace, ps, and so on).
[arnoldg@dt-login03 python]$ squeue -u $USER
             JOBID PARTITION     NAME     USER ST       TIME  NODES NODELIST(REASON)
           1214412 gpuA40x4- interact  arnoldg  R       8:14      1 gpub045
[arnoldg@dt-login03 python]$ ssh gpub045
gpub045.delta.internal.ncsa.edu (141.142.145.145)
  OS: RedHat 8.4   HW: HPE   CPU: 64x    RAM: 252 GB
Last login: Wed Dec 14 09:45:26 2022 from 141.142.144.42
[arnoldg@gpub045 ~]$ nvidia-smi

[arnoldg@gpub045 ~]$ module load nvtop

The following have been reloaded with a version change:
1) cuda/11.6.1 => cuda/11.7.0

[arnoldg@gpub045 ~]$ nvtop

[arnoldg@gpub045 ~]$ module load anaconda3_gpu
[arnoldg@gpub045 ~]$ nvitop

[arnoldg@gpub045 ~]$ top -u $USER
nvidia-smi:
nvtop:
nvitop:
top -u $USER:
Launching jobs using Globus Compute
Globus Compute is a distributed Function-as-a-Service (FaaS) platform designed for scientific computing. It enables researchers and developers to define, register, and execute Python functions remotely without managing the underlying infrastructure directly.
To launch a job using Globus Compute, you need to have a Globus Compute endpoint set up. A Globus Compute Endpoint is a software — installed and running on a target computing resource — that listens for function execution requests from the Globus Compute service and dispatches them to the local compute environment (e.g., a batch scheduler like Slurm or PBS, or a local process pool). Endpoints act as the bridge between the Globus Compute cloud service and the actual hardware where computation takes place.
User Script
     ↓
Globus Compute Service (Cloud)
     ↓
Globus Compute Endpoint (on HPC/cluster/laptop)
     ↓
Local Job Scheduler (e.g., Slurm, PBS)
     ↓
Compute Nodes (actual execution)
NCSA Delta Globus Compute Multi-user Endpoint (MEP)
NCSA Delta offers a Globus Compute Multi-user Endpoint for users to launch jobs using Globus Compute. A Multi-User Endpoint (MEP) is a special type of Globus Compute endpoint that is not tied to a single user account. Instead, it is deployed, owned, and maintained by a system administrator at the facility level. The MEP runs as a privileged system service and is capable of accepting function execution requests from multiple authenticated users. Jobs submitted through the MEP are dispatched under the submitting user’s account and allocation, ensuring that resource accounting, quotas, and scheduling priorities are preserved per user. The globus compute MEP lets users submit jobs to the cluster without having to login to the cluster.
NCSA Delta MEP is available at the following URL: https://app.globus.org/compute/endpoints/4a266c83-3c68-4a75-99b3-9c7459f2f7ef and has the endpoint ID 4a266c83-3c68-4a75-99b3-9c7459f2f7ef.
Submitting Jobs via the Multi-User Endpoint
Step 1: Install the Globus Compute SDK
pip install globus-compute-sdk
Steps 2–4 below are Python scripts. Run them in order in the same session—for example in a .py file executed once, in an interactive Python shell, or as consecutive cells in a Jupyter notebook.
Step 2: Configure and initialize the Globus Compute Executor
user_config = {
   "account": "<your-allocation-name>",
   "partition": "<partition-name>",
   "scheduler_options": (
      "#SBATCH --gpus-per-node=1\n"
      "#SBATCH --time=00:10:00"
   ),
}
delta_mep = "<endpointID>" # Replace <endpointID> with the Delta endpoint UUID

from globus_compute_sdk import Executor
gce = Executor(endpoint_id=delta_mep, user_endpoint_config=user_config)
Step 3: Prepare the Job Script
def hello_world():
    import subprocess

    py = subprocess.run(['python3', '-V'], capture_output=True, text=True)
    gce = subprocess.run(
        ['globus-compute-endpoint', 'version'], capture_output=True, text=True
    )

    return {
        'message': 'Hello World!',
        'python3 -V': (py.stdout or py.stderr).strip(),
        'globus-compute-endpoint version': (gce.stdout or gce.stderr).strip(),
    }
Step 4: Submit the Job
hello_future = gce.submit(hello_world)
hello_result = hello_future.result()
print(hello_result)
For more information, please refer to the Globus Compute Tutorials and Globus Compute Multi-User Endpoints Documentation.
Personal Globus Compute Endpoint
If you want to set up your own Globus Compute endpoint, please follow the instructions in the Globus Compute endpoints quickstart.
Once you have a Globus Compute endpoint set up, you can launch a job using the steps outlined above.
Sample Scripts
Serial Jobs on CPU Nodes
serial example script (click to expand/collapse)
$ cat job.slurm
#!/bin/bash
#SBATCH --mem=16g
#SBATCH --nodes=1
#SBATCH --ntasks-per-node=1
#SBATCH --cpus-per-task=4    # <- match to OMP_NUM_THREADS
#SBATCH --partition=cpu      # <- or one of: gpuA100x4 gpuA40x4 gpuA100x8 gpuMI100x8
#SBATCH --account=account_name    # <- match to a "Project" returned by the "accounts" command
#SBATCH --job-name=myjobtest
#SBATCH --time=00:10:00      # hh:mm:ss for the job
#SBATCH --constraint="scratch"
#SBATCH -e slurm-%j.err
#SBATCH -o slurm-%j.out
### GPU options ###
##SBATCH --gpus-per-node=2
##SBATCH --gpu-bind=none     # <- or closest
##SBATCH --mail-user=you@yourinstitution.edu
##SBATCH --mail-type="BEGIN,END" See sbatch or srun man pages for more email options


module reset # drop modules and explicitly load the ones needed
             # (good job metadata and reproducibility)
             # $WORK and $SCRATCH are now set
module load python  # ... or any appropriate modules
module list  # job documentation and metadata
echo "job is starting on `hostname`"
srun python3 myprog.py
MPI on CPU Nodes
mpi example script (click to expand/collapse)
#!/bin/bash
#SBATCH --mem=16g
#SBATCH --nodes=2
#SBATCH --ntasks-per-node=32
#SBATCH --cpus-per-task=2    # <- match to OMP_NUM_THREADS
#SBATCH --partition=cpu      # <- or one of: gpuA100x4 gpuA40x4 gpuA100x8 gpuMI100x8
#SBATCH --account=account_name    # <- match to a "Project" returned by the "accounts" command
#SBATCH --job-name=mympi
#SBATCH --time=00:10:00      # hh:mm:ss for the job
#SBATCH --constraint="scratch"
#SBATCH -e slurm-%j.err
#SBATCH -o slurm-%j.out
### GPU options ###
##SBATCH --gpus-per-node=2
##SBATCH --gpu-bind=none     # <- or closest ##SBATCH --mail-user=you@yourinstitution.edu
##SBATCH --mail-type="BEGIN,END" See sbatch or srun man pages for more email options

module reset # drop modules and explicitly load the ones needed
             # (good job metadata and reproducibility)
             # $WORK and $SCRATCH are now set

module list  # job documentation and metadata
echo "job is starting on `hostname`"
srun osu_reduce
OpenMP on CPU Nodes
openmp example script (click to expand/collapse)
#!/bin/bash
#SBATCH --mem=16g
#SBATCH --nodes=1
#SBATCH --ntasks-per-node=1
#SBATCH --cpus-per-task=32   # <- match to OMP_NUM_THREADS
#SBATCH --partition=cpu      # <- or one of: gpuA100x4 gpuA40x4 gpuA100x8 gpuMI100x8
#SBATCH --account=account_name    # <- match to a '"Project" returned by the "accounts" command
#SBATCH --job-name=myopenmp
#SBATCH --time=00:10:00      # hh:mm:ss for the job
#SBATCH --constraint="scratch"
#SBATCH -e slurm-%j.err
#SBATCH -o slurm-%j.out
### GPU options ###
##SBATCH --gpus-per-node=2
##SBATCH --gpu-bind=none     # <- or closest
##SBATCH --mail-user=you@yourinstitution.edu
##SBATCH --mail-type="BEGIN,END" See sbatch or srun man pages for more email options

module reset # drop modules and explicitly load the ones needed
             # (good job metadata and reproducibility)
             # $WORK and $SCRATCH are now set

module list  # job documentation and metadata
echo "job is starting on `hostname`"
export OMP_NUM_THREADS=32
srun stream_gcc
Hybrid (MPI + OpenMP or MPI+X) on CPU Nodes
mpi+x example script (click to expand/collapse)
#!/bin/bash
#SBATCH --mem=16g
#SBATCH --nodes=2
#SBATCH --ntasks-per-node=4
#SBATCH --cpus-per-task=4    # <- match to OMP_NUM_THREADS
#SBATCH --partition=cpu      # <- or one of: gpuA100x4 gpuA40x4 gpuA100x8 gpuMI100x8
#SBATCH --account=account_name    # <- match to a "Project" returned by the "accounts" command
#SBATCH --job-name=mympi+x
#SBATCH --time=00:10:00      # hh:mm:ss for the job
#SBATCH --constraint="scratch"
#SBATCH -e slurm-%j.err
#SBATCH -o slurm-%j.out
### GPU options ###
##SBATCH --gpus-per-node=2
##SBATCH --gpu-bind=none     # <- or closest
##SBATCH --mail-user=you@yourinstitution.edu
##SBATCH --mail-type="BEGIN,END" See sbatch or srun man pages for more email options

module reset # drop modules and explicitly load the ones needed
             # (good job metadata and reproducibility)
             # $WORK and $SCRATCH are now set

module list  # job documentation and metadata
echo "job is starting on `hostname`"
export OMP_NUM_THREADS=4
srun xthi
4 GPUs Together on a Compute Node
4 gpus example script (click to expand/collapse)
#!/bin/bash
#SBATCH --job-name="a.out_symmetric"
#SBATCH --output="a.out.%j.%N.out"
#SBATCH --partition=gpuA100x4
#SBATCH --mem=208G
#SBATCH --nodes=1
#SBATCH --ntasks-per-node=4  # could be 1 for py-torch
#SBATCH --cpus-per-task=16   # spread out to use 1 core per numa, set to 64 if tasks is 1
#SBATCH --constraint="scratch"
#SBATCH --gpus-per-node=4
#SBATCH --gpu-bind=closest   # select a cpu close to gpu on pci bus topology
#SBATCH --account=account_name    # <- match to a "Project" returned by the "accounts" command
#SBATCH --exclusive  # dedicated node for this job
#SBATCH --no-requeue
#SBATCH -t 04:00:00
#SBATCH -e slurm-%j.err
#SBATCH -o slurm-%j.out

export OMP_NUM_THREADS=1  # if code is not multithreaded, otherwise set to 8 or 16
srun -N 1 -n 4 ./a.out > myjob.out
# py-torch example, --ntasks-per-node=1 --cpus-per-task=64
# srun python3 multiple_gpu.py
1 GPU on a Compute Node
1 gpu example script (click to expand/collapse)
#!/bin/bash
#SBATCH --job-name="a.out_symmetric"
#SBATCH --output="a.out.%j.%N.out"
#SBATCH --partition=gpuA40x4
#SBATCH --mem=50G
#SBATCH --nodes=1
#SBATCH --ntasks-per-node=1  # could be 1 for py-torch
#SBATCH --cpus-per-task=16   # spread out to use 1 core per numa, set to 64 if tasks is 1
#SBATCH --constraint="scratch"
#SBATCH --gpus-per-node=1
#SBATCH --gpu-bind=closest   # select a cpu close to gpu on pci bus topology
#SBATCH --account=account_name    # <- match to a "Project" returned by the "accounts" command
#SBATCH --exclusive  # dedicated node for this job
#SBATCH --no-requeue
#SBATCH -t 04:00:00
#SBATCH -e slurm-%j.err
#SBATCH -o slurm-%j.out

export OMP_NUM_THREADS=1  # if code is not multithreaded, otherwise set to 8 or 16
srun -N 1 -n 4 ./a.out > myjob.out
# py-torch example, --ntasks-per-node=1 --cpus-per-task=16
# srun python3 multiple_gpu.py
PyTorch Multi-Node
pytorch multi-node example script (click to expand/collapse)
#!/bin/bash
#SBATCH --account=account_name
#SBATCH --job-name=multinode-example
#SBATCH --partition=gpuA40x4
#SBATCH --nodes=2
#SBATCH --ntasks-per-node=1
#SBATCH --gpus-per-node=4
#SBATCH --cpus-per-task=8
#SBATCH --time=00:40:00
#SBATCH --output=ddp_training_%j.log
#SBATCH --error=ddp_training_%j.err

nodes=( $( scontrol show hostnames $SLURM_JOB_NODELIST ) )
nodes_array=($nodes)
head_node=${nodes_array[0]}
head_node_ip=$(srun --nodes=1 --ntasks=1 -w "$head_node" hostname --ip-address)
echo "Head node: $head_node"
echo "Head node IP: $head_node_ip"

export LOGLEVEL=INFO

module load pytorch-conda
export NCCL_DEBUG=INFO
export NCCL_SOCKET_IFNAME=hsn
module load aws-ofi-nccl # loads the nccl built with the AWS nccl plugin for Slingshot11
module list
echo "Job is starting on `hostname`"

time srun torchrun --nnodes ${SLURM_NNODES} \
     --nproc_per_node ${SLURM_GPUS_PER_NODE} \
     --rdzv_id $RANDOM --rdzv_backend c10d \
     --rdzv_endpoint="$head_node_ip:29500" \
     ${SLURM_SUBMIT_DIR}/multinode.py 50 10

rm -f snapshot.pt
Parametric / Array / HTC Jobs
Not yet implemented.