Storage and Data Guide
Storage Areas
Name |
Mount Path |
Quota Policy |
Purge Policy |
Snapshots |
Underlying System |
|---|---|---|---|---|---|
home |
|
Soft (Hard) Block: 100GiB (102GiB) iNode: 750,000 (760,000) |
No purge |
Yes; daily for 30 days |
|
project |
|
Investment-based for Bytes; 1.5 million inodes/TB |
No purge |
No |
|
scratch |
|
10TB/User; No inode quota |
Daily Purge of files older than 30 days |
No |
ICCP Scratch |
local scratch |
|
None |
Following job completion |
No |
node local drives |
Home
The /u area of the filesystem is where you land when you log into the cluster via SSH and is where your $HOME environment variable points.
This area has a fairly small quota and is meant to contain your configuration files, job output/error files, and smaller software installations.
Your /u area of the filesystem is automatically provisioned during the account provisioning process and the space is provided by the program.
It is not possible to request an expansion of home directory quota.
The 7-day grace period on /u means that if the usage in your home directory is over 100GB for a 7-day period, your home directory will stop accepting new writes until data has been cleared to below the 100GB threshold.
Project
The /projects area of the filesystem is where an investment group’s (single faculty member, lab group, department, or an entire college) storage capacity resides.
You can have access to multiple project subdirectories if you are a member of various investment groups, and have been granted access to the space by the investments PI or Tech Rep.
This storage area is where the bulk of the filesystem’s capacity is allocated.
Scratch
The /scratch area of the filesystem is where you can place data while it’s under active work.
The scratch area of the cluster is provisioned by the Campus Cluster program for all users to have access to.
As noted in the summary table, files older than 30 days are purged from this space, based on a file’s last access time. The admin team maintains various tools to detect and monitor for users abusing the scratch area (such as by artificially modifying file access times) to attempt to circumvent the purge policy. Doing so is a violation of the cluster’s policy and is not allowed. If you believe you have a legitimate need to retain data in scratch for longer than 30 days, please submit a support request.
Scratch location: /scratch/$your_netid
Scratch — Local
The /scratch.local area is allocated on an individual compute node on the Campus Cluster or HTC system, this disk is provided by a compute node’s local disk, not the shared filesystem.
The size of /scratch.local will vary across nodes of different investments. Be careful on assuming size, especially when running in the secondary queue where you have less control over what node your job lands on.
Data in /scratch.local is purged following a job’s completion, prior to the next job beginning on the node.
Storage Policies
Scratch Purge
Files older than 30 days in the /scratch area of the filesystem are purged daily, based on the file’s access time as recorded in the filesystem’s metadata.
Once data is purged via the purge policy, there is no recovering the data.
It has been permanently destroyed.
Move high value data out of this space to make sure it doesn’t get forgotten and purged.
Filesystem Snapshots
Daily snapshots are run on the filesystem for the /u area.
These snapshots allow you to go back to a point in time and retrieve data you may have accidentally modified, deleted, or overwritten.
These snapshots are not backups and reside on the same hardware as the primary copy of the data.
To access snapshots for data in your /u directory, run cd ~/.snapshot/snapshots-daily-_YYYY-MM-DD_HH_mm_ss_UTC/ where “YYY-MM-DD_HH_mm_ss” is the timestamp of the snapshot you want to recover from. To list the available snapshots, run the command: ls ~/.snapshot/
Inode Quotas
An inode is a metadata record in the filesystem that tracks information about a file or directory (such as what blocks it lives on disk, permissions, ACL, extended attributes, etc.). There is an inode record for every file or directory in the filesystem.
For inode limits on /u space there is a limit of 750,000 inodes.
For project directories, there is a 1.5 million inode per-TB policy on the system (Taiga’s standard). Since metadata is stored on NVME for fast access, this quota ensures a tolerable ratio of data to metadata. If this quota becomes an issue for your team, please submit a support request to discuss a solution. For ways to help decrease inode usage, refer to Data Compression and Consolidation.
At present there are no inode quotas on scratch.
Data Classifications
There are many special data classifications in use by researchers across campus. Some types are permitted to be stored on Illinois Research Storage (the Campus Cluster), and some are not. Below are descriptions about some of those data types. If you have any questions, please submit a support request.
International Traffic in Arms Regulation (ITAR) – ITAR data is permitted to be stored on Illinois Research Storage, however all proper procedures and notifications must be followed. For more information about those procedures and who to contact, refer to the OVCR’s documentation.
Health Insurance Portability and Accountability Act (HIPAA) / Personal Identifiable Health (PIH) – HIPAA / PIH data is not permitted to be stored on Illinois Research Storage.
Accessing Storage
There are a variety of ways to access Research Storage, and we continue to work with users to find more ways. Below is a summary table of where/how Research Storage is accessible, with further descriptions below.
Location/Method |
|
|
|
|---|---|---|---|
HPC Head Nodes |
Yes |
Yes |
Yes |
HPC Compute Nodes |
Yes |
Yes |
Yes |
HTC Head Nodes |
Yes |
Yes |
Yes |
HTC Compute Nodes |
Yes |
Yes |
Yes |
CLI DTN Nodes |
Yes |
Yes |
Yes |
Illinois Research Storage Globus Endpoints |
Yes |
Yes |
Yes |
Globus Shared Endpoints (external sharing) |
No |
Yes |
No |
Research Storage S3 Endpoint |
No |
Yes# |
No |
Illinios Computes Research Notebooks (ICRN) |
Yes |
Yes |
No |
Delta/DeltaAI |
No |
Yes |
No |
Lab Workstations (Research Labs) |
No |
Yes# |
No |
#Available Upon Request (refer to the NFS / SAMBA sections)
HPC Head Nodes & Compute Nodes
All filesystem areas are accessible via the Campus Cluster’s batch head nodes and compute nodes to run jobs and interact with data on the command line.
HTC Head Nodes
The /u, /projects, and /scratch spaces are mounted and available on the HTC head nodes for users to access their data from those machines.
HTC Compute Nodes
The /u, /projects, and /scratch spaces are mounted and available on all HTC compute nodes for job access to data.
CLI DTN Nodes
The filesystem areas are available for access via Taiga’s export services infrastructure. These DTN nodes provide a target for transferring data to and from research storage using common command line interface (CLI) data transfer methods such as rsync, scp, sftp, and others.
The DTN nodes sit behind the round-robin alias of cli-dtn.researchdata.illinois.edu.
Globus Endpoints
Globus is a web-based file transfer system that works in the background to move files between systems with Globus endpoints. Refer to Transferring Files - Globus for complete instructions on using Globus with NCSA computing resources.
The filesystem areas are accessible via the cluster’s Globus endpoint, not just for transfers to/from the system from/to other Globus endpoints, but also Box storage and Google Drive storage via the respective Globus endpoint collections.
You can also create a shared Globus endpoint to share data with people that are not affiliated with the University of Illinois system.
POSIX Endpoint
The Campus Cluster POSIX endpoint collection name is “Illinois Research Storage”.
Box Endpoint
The Campus Cluster Box endpoint collection name is “Illinois Research Storage - Box”.
Google Drive Endpoint
The Campus Cluster Google Drive endpoint collection name is “Illinois Research Storage - Google Drive”.
Delta/DeltaAI
Your /projects space is available on NCSA’s Delta & DeltaAI systems beneath /taiga/illinois/ (same path to your space, except the top directory is /taiga instead of /projects). You can also see the spaces available on Delta/DeltaAI by running the “taigaquota” command on those systems.
Lab Workstations/Laptops
Groups can request that their /projects area be made accessible for mounting on workstations and laptops in their research labs on campus.
This access method is especially helpful for data acquisition from instruments straight onto the Research Storage system, and for viewing files remotely for use in other GUI-based software that is run on local machines instead of in a clustered environment.
This access method is only available to machines on campus, and some security restrictions must be followed.
For more information refer to the NFS / SAMBA sections.
Accessing Delta Storage
If you would like to access your Delta/DeltaAI “/projects” storage (/taiga/nsf/delta/XXXX) on Illinois Campus Cluster, please submit a support request letting us know the four letter project code(s) of your Delta allocation(s).
Managing Your Data Usage
Quota Command
Use the quota command to view a summary of your usage across all areas of the filesystem and your team’s usage of the project space(s) you have access to.
The output of the quota command is fed by live data from the file system; however there will be a slight delay between the creation/deletion of data and the update to the output of the quota command. When the filesystem is under heavy load, quota data may get a bit out of sync with reality; the system runs a quota verification script daily to force the quota data to sync up across the system.
[your_netid@cc-login1 ~]$ quota
Quota usage for user your_netid:
---------------------------------------------------------------------------------------------------------------------
|              Directory Path               |  Block  |  Soft   |  Hard   |    Files    |    Soft     |    Hard     |
|                                           |  Used   |  Quota  |  Limit  |    Used     |    Quota    |    Limit    |
---------------------------------------------------------------------------------------------------------------------
| /u/your_netid                             | 1G      | 100G    | 103G    | 2000        | 750000      | 760000      |
---------------------------------------------------------------------------------------------------------------------
| /projects/nsf/delta/bbYY                  | 1.858T  | 1.953T  | 2.002T  | 2392193     | 3000000     | 3300000     |
| /projects/nsf/delta/bbXX                  | 259.2G  | 500G    | 550G    | 489         | 375000      | 412500      |
| /projects/illinois/eng/cs/xxxxxxxx        | 8.599T  | 10T     | 10T     | 5174267     | 15000000    | 15000000    |
| /projects/illinois/las/psych/xxxxx        | 59.43G  | 1T      | 1T      | 56076       | 1500000     | 1500000     |
---------------------------------------------------------------------------------------------------------------------
| /scratch/your_netid                       | 12k     | 10T     | 10T     | 1           | none        | none        |
---------------------------------------------------------------------------------------------------------------------
Block Used - How much capacity is comsumed by all users who have data in that allocation
User File Used - How many inodes are consumed by all users who have data in that allocation
The relevant soft and hard quotas (limits) for each of the areas are also shown in their respective columns for both bytes and inodes.
Guides/Tutorials
How to Relocate Your .conda Directory to Project Space
Note
With larger /u quotas starting in January 2025, this procedure should end up being needed less often.
Large conda installations can exceed your home directory size. This can be avoided by relocating your .conda directory to your project space, which has a larger quota than your home directory.
Relocate your .conda directory to your project space using the following steps:
Make a
.condadirectory in your project space.[testuser1@cc-login1 ~]$ mkdir -p /projects/illinois/$college/$department/$pi_netid/<your_username>/.conda
Copy over existing
.condadata.[testuser1@cc-login1 ~]$ rsync -aAvP ~/.conda/* /projects/illinois/$college/$department/$pi_netid/<your_username>/.conda/
Remove your
.condadirectory from home.[testuser1@cc-login1 ~]$ rm -rf ~/.conda
Create a link to your new
.condadirectory.[testuser1@cc-login1 ~]$ ln -s /projects/illinois/$college/$department/$pi_netid/<your_username>/.conda ~/.conda
NFS Access to Research Storage
Investor groups can request that their /projects area be made available via NFS for mounting on machines local to their lab team.
Project PIs or technical representatives can request NFS access to their /projects area by submitting a support request with the following information:
Mount Type (Read-Only or Read-Write)
Project Area being exported
List of IP’s or IP CIDR range of the machines that need mount. (These machines must have a public IP address or a Campus internal routed IP address for them to be able to reach the NFS servers.)
NFS exports of the filesystem will be root-squashed which means that a user interacting with the storage on the remote machine via that local machine’s root account will have file access permissions that map to the nfsnobody user (generally UID 65534 on Linux systems).
When NFS mounting storage, it is advised to have user UIDs align with what they are on the Research Storage system. You can find your UID on the system, by running the id command.
See example below:
[testuser1@cc-login ~]$ id
uid=7861(testuser1) gid=7861(testuser1) groups=7861(testuser1) context=unconfined_u:unconfined_r:unconfined_t:s0-s0:c0.c1023
[testuser1@cc-login ~]$
Once exported, the filesystem can be NFS mounted via two methods:
(preferred)
autofs- Refer to the autofs section of the Red Hat guide.Manually add the mount to the host’s
/etc/fstabfile - Refer to the /etc/fstab section of the Red Hat guide.
The round-robin DNS entry for the Research Storage NFS clustered endpoint is: nfs.researchdata.illinois.edu Make sure you have the nfs-utils package installed on your machine. Our recommendations for NFS mount parameters are as follows:
[rw/ro],soft,timeo=200,vers=4,rsize=16384,wsize=16384
Samba Access to Research Storage
Investor groups can request that their /projects area be made available via Samba for mounting on machines local to their lab team.
Project PIs or technical representatives can request Samba access to their /projects area by submitting a support request with the following information:
Project Area being Exported
Following the request, the Research Storage team will export that area of the filesystem to users in that project’s group as seen in the User Portal. To add/remove users who can mount the project area, add/remove them from the group in the portal.
Once exported the round robin DNS entry for the SAMBA node pool is “smb.researchdata.illinois.edu”. There are a guide to mounting a SAMBA share on Windows machines and a guide for mounting on Mac OS based machines available for reference. Make sure the machine is connected to the campus network and has a campus public IP address or an internally routed private IP address.
For Windows the path to the share should look like:
\\smb.researchdata.illinois.edu\$your_project_name
For MacOS the server address to use is:
smb://smb.researchdata.illinois.edu
For both operating systems, use your campus AD credentials (the same ones you use to access the cluster) to access these shares.
Data Compression and Consolidation
It can often be handy to bundle up a bunch of files into a single file bundle. This can make data transport easier and more efficient. It also helps reduce the space the data takes up in disks, in capacity and inodes.
As noted in the policy section on inode limits, we will discuss how to compress files together into a bundle and then zip them up to save space. To compress files with tar + gzip, see the example below where the images folder is run through tar + gz to create images_bundle.tar.gz:
## Just for illustration, this folder has 4,896 image files in it
[testuser1@cc-login hubble]~ ls images/ | wc -l
4896

## tar and compress the folder, example:
[testuser1@cc-login hubble]~ tar -zcvf images_bundle.tar.gz images

## There should now be a single archive file that contains all the images
[testuser1@cc-login hubble]~ ls
images images_bundle.tar.gz

## You can now remove the original folder as all its contents are in the tar.gz file
[testuser1@cc-login hubble]~ rm -rf images
CLI Transfer Method: rsync
Use rsync for small to modest transfers, please target the cli-dtn.researchdata.illinois.edu endpoint. Refer to Transferring Files - rsync for instructions on how to use rsync.
CLI Transfer Method: scp
Use scp for small to modest transfers, please target the cli-dtn.researchdata.illinois.edu endpoint. Refer to Transferring Files - scp for instructions on how to use scp.
CLI Transfer Method: sftp
Refer to Transferring Files - sftp for instructions on how to use WinSCP and Cyberduck, please target the cli-dtn.researchdata.illinois.edu endpoint.
CLI Transfer Method: rclone
The Rclone file transfer utility is installed on the cli-dtn.researchdata.illinois.edu endpoint.
Configuring Rclone for data transfer can be done for a variety of storage backends.
If you are targeting transferring data to/from Research Storage from/to a local machine, it is best to set up the Research Storage endpoint using the SFTP connector on your local machine.
If you are targeting the transfer of data to/from Research Storage from/to another cloud storage service (such as Amazon S3, Box, Dropbox, Google Drive, or OneDrive), it is best to set up that endpoint as a source/target on the cli-dtn.researchdata.illinois.edu endpoint itself.
For instructions on configuring Rclone to send/receive data from your desired location, refer to the Rclone documentation.
How to Create a Shared Globus Endpoint
Globus Shared Endpoint functionality is a great way to share data with people that are not affiliated with the University of Illinois system. To grant a person at an external organization access to data you manage, all the other person needs is a free Globus account and an endpoint on their side to transfer the data to.
To set up a shared endpoint:
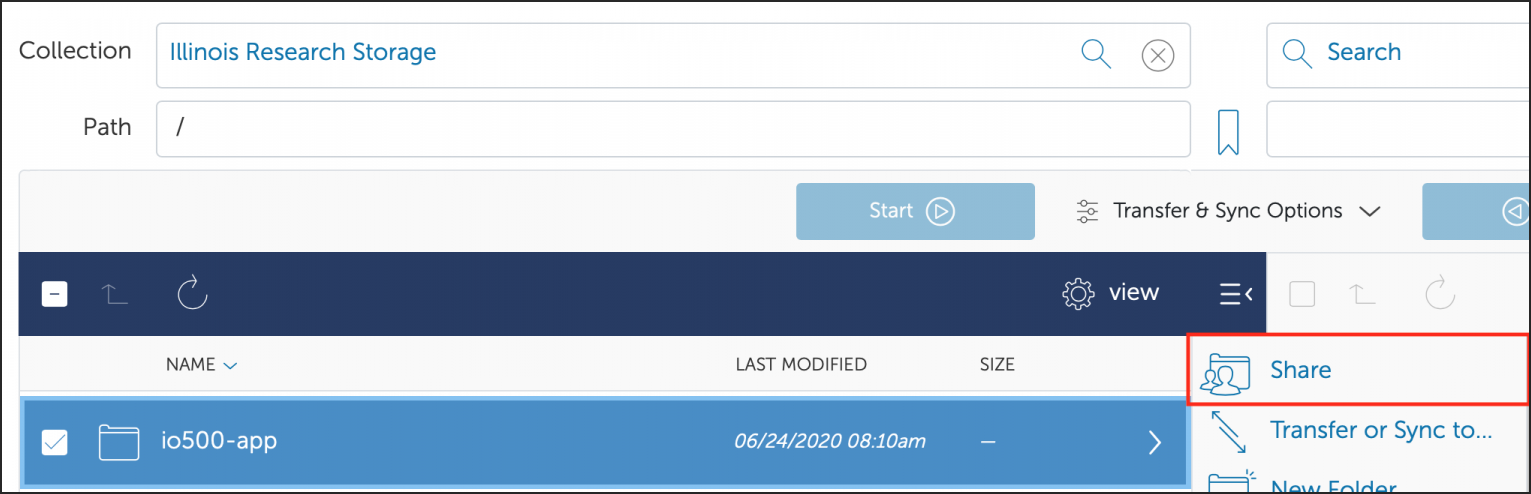
Log into Globus and connect to the “Illinois Research Storage” collection.
Navigate to, and select, the directory you want to share with external users; currently only data in
/projectsis allowed to be shared externally.Click the “Share” button to the right of the directory.
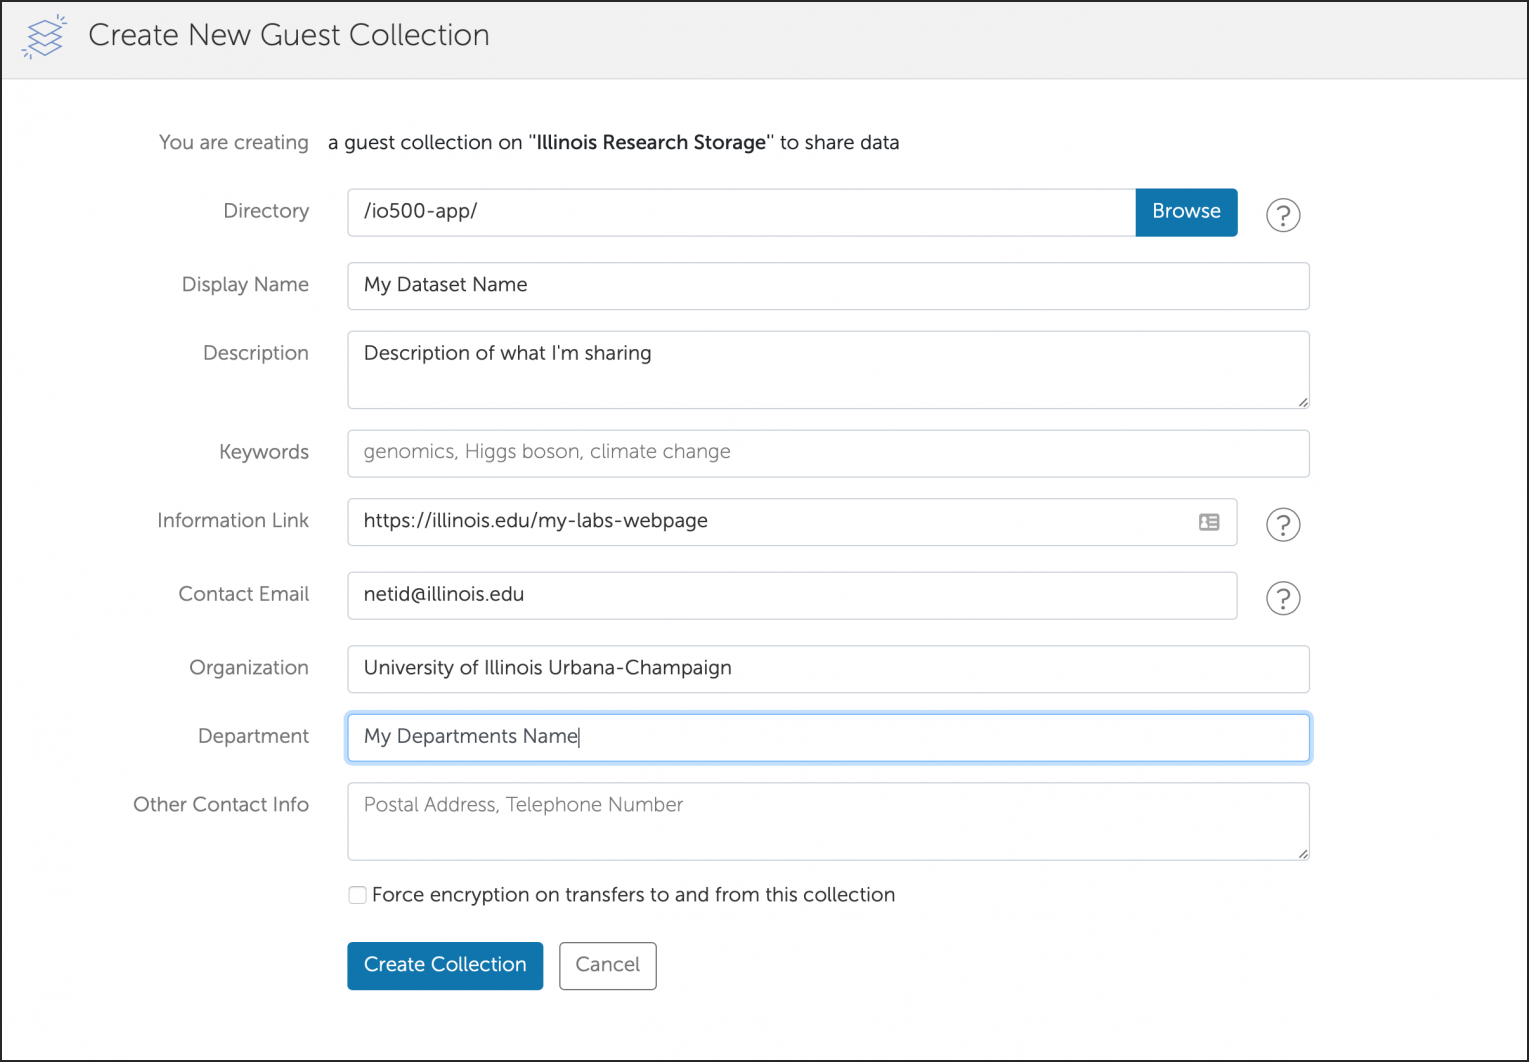
Click the “Add Guest Collection” button.

Fill in all the information about the share and click the “Create Collection” button. The more information you fill in the better, and the easier for others to find.
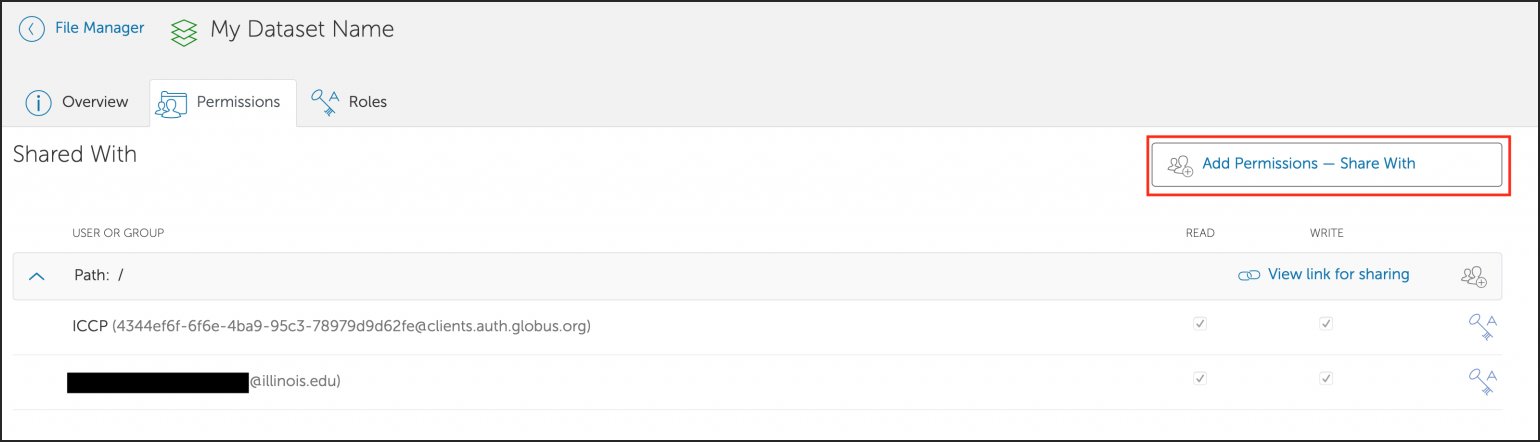
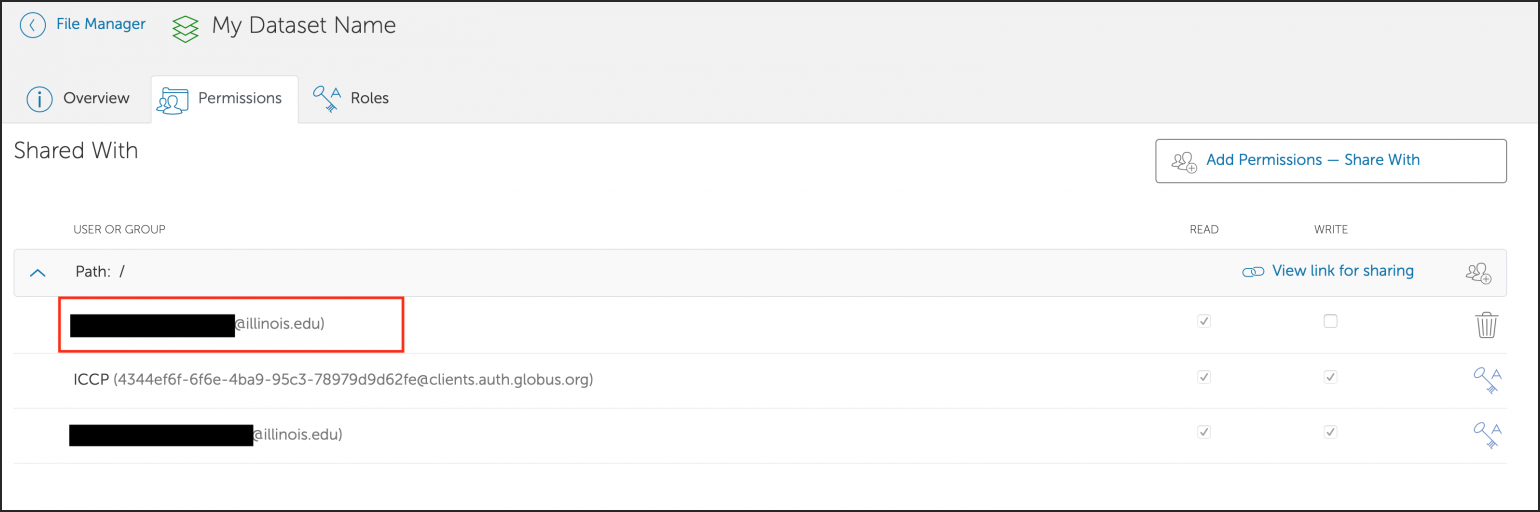
After creating the collection, you will get dropped into the permissions tab for that shared endpoint. Click the “Add Permissions - Share With” button to add people you want to share the data with.
Fill in the share information and click the “Add Permission “ button. You can grant access to a smaller subset of your dataset (using the “Path” field) and choose read or read/write access.
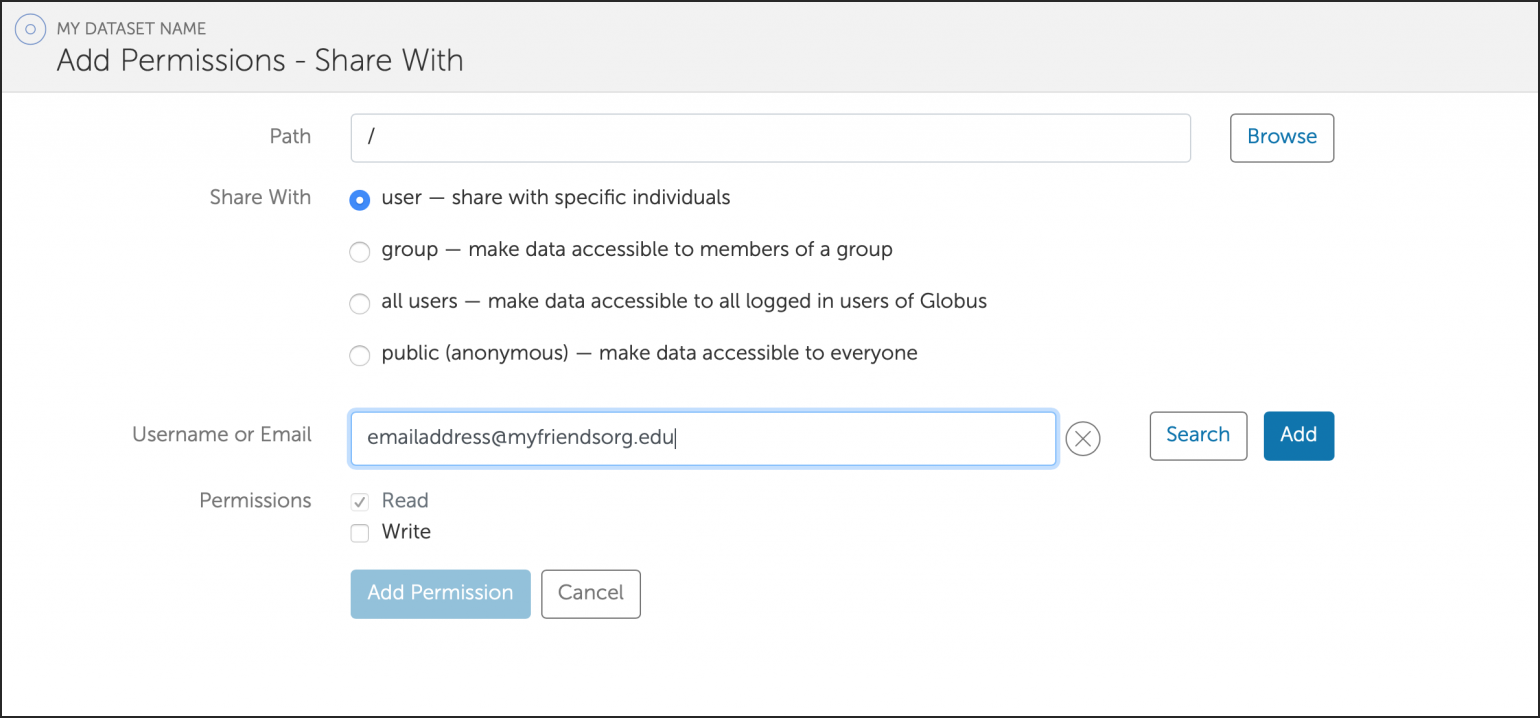
Once added, you should see the person in the “Shared With” section.
Optimizing Data and I/O Access
Caution against large file counts inside a single directory
Creating hundreds of thousands or millions of files within a single directory (with no sub directories) can cause issues trying to ls that directory. It can also slow down access to files in that directory as different threads working to process files in those large directories will “fight” for an access lock on the parent directory, causing contention that can greatly slow down your workloads. Leveraging subdirectories to reduce the file count within a given directory level is encouraged.
Impact of I/O Size on Throughput performance
The filesystem block size impacts the I/O performance that applications receive when running compute jobs on the HPC and HTC systems. When applications are doing I/O on the filesystem, the size of their I/O requests are a key trait to determining how much performance they will receive. When possible, you should configure your workflows to use larger files.
For applications that can’t escape using tiny files, sometimes the use of HDF files can help improve application performance by creating a virtual filesystem within a file that contains all the data.