Getting Started
This guide is intended for users with no prior experience with Linux/Command Line Interface (CLI) or cluster computing. Refer to the user guide sections for detailed information on using the Campus Cluster. New users may also benefit from the Getting Started on the Illinois Campus Cluster tutorial and Campus Cluster training videos.
Introduction
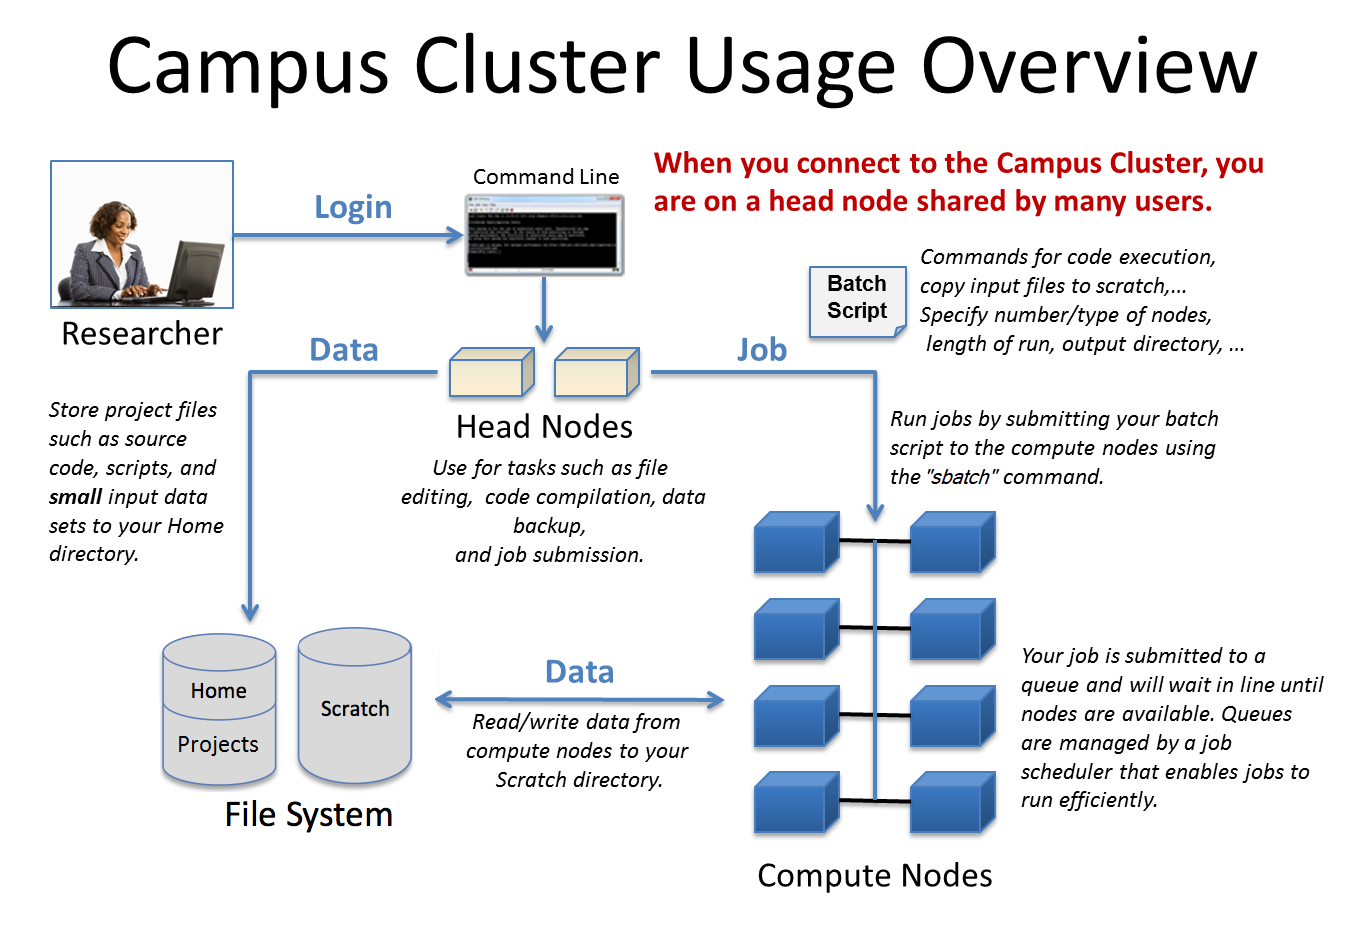
The basic building block of a Linux cluster is a node. A node is an individual computer in the cluster. On a cluster, there are different types of nodes to perform specific tasks. The two primary types of nodes on a cluster are:
Compute nodes — Compute nodes are the majority of nodes on a cluster and are the nodes that run user jobs.
Head nodes — There is at least one head node on a cluster. Head nodes are where you log in from your local computer (laptop/desktop).
User access to the compute nodes is only available via a batch job. This is typically a sequence of commands listed in a file called a batch script that can be executed without the intervention of the user. The batch script is a plain text file that starts with directives that describe the requirements of the job such as the number of nodes and wall clock time, followed by the user’s commands to execute specific tasks or run specific code. An interactive batch job provides a way to get interactive access to a compute node via a batch job; this is useful for testing and debugging.
From the head nodes, the batch job is submitted to a queue to be scheduled to run when the compute node resources requested are available. On the head nodes, users can also:
Check the status of batch jobs
Monitor the progress of batch jobs
Delete batch jobs
Warning
The head nodes on the Campus Cluster are a shared resource for all users of the system. Computational use of the head nodes should be limited to editing, compiling, and for short non-intensive runs. The administrators may terminate user processes on the head nodes that impact the system without warning. Users should do all production work by submitting jobs to the batch system.
Using the Campus Cluster
Head Node
Learn Linux basics (Working with the CLI).
Connect to a head node from your local computer using an SSH client (Accessing the System).
Transfer files to and from the Campus Cluster (Data Transfer).
Use a text editor (Text Editors).
Build applications (Programming Environment).
Submit batch jobs for scheduling on the compute nodes (Batch Job Submission).
Compute Node
All batch jobs run on the compute nodes.
Each investor group has a dedicated primary queue.
There is also a shared secondary queue for opportunistic access to idle nodes.
Access
Users with accounts on the Campus Cluster connect to the head nodes via Secure Shell (SSH) client using their official University of Illinois NetID and NetID password. The below table shows the hostname that provides round-robin access to head nodes of the Campus Cluster instances.
Linux and MacOS based machines have an SSH client installed by default; desktops/laptops running versions of Windows prior to Windows 10 version 1803 do not. See the SSH Clients section for a list of popular SSH clients that can be downloaded for use.
Access Method |
Hostname |
Head Node |
|---|---|---|
SSH |
|
|
Note
In the examples within this getting started guide, My_NetID represents your official University of Illinois NetID.
SSH clients come in two formats:
Graphical User Interface (GUI) – when logging in from a Windows based machine.
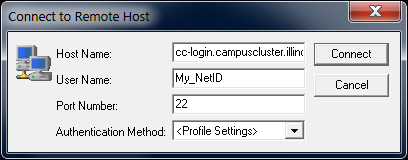
Command Line Interface (CLI) – when logging in from a Linux/Unix based system (Fedora, SuSE, Mac OS, and so on).
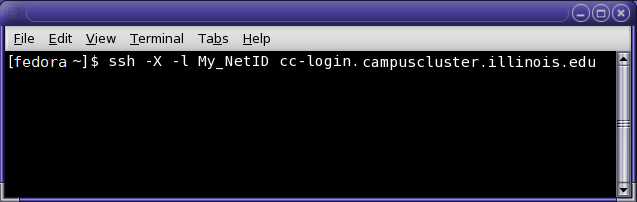
Users are automatically connected to one of the four head nodes of the Campus Cluster and will see a prompt, similar to the one listed below, after successfully logging into the Campus Cluster.
[My_NetID@cc-login1 ~]$
While logged into the Campus Cluster, users interact with resources through the CLI. This means that users will need to issue commands on the command line to accomplish various tasks.
Working with the CLI
Since the Campus Cluster’s user environment is Linux based, it is essential to have a basic working knowledge of Linux to be able to compute successfully on the Campus Cluster. The information in the tables below, and online tutorials, can help new Linux users learn enough to get started.
Useful Unix/Linux Commands
Command |
Description |
|---|---|
|
List directory contents |
|
Detailed listing of directory contents |
|
Display the path of the current/working directory |
|
Display online help (manual page) for command_name |
|
Display your home directory disc usage |
|
Display detailed information about your running process |
|
Log out of your current session |
|
Display a list of the commands you’ve recently run |
|
Display the system date and time |
Command |
Description |
|---|---|
|
Create a new (or edit an existing) file named myfile with a simple text editor |
|
Display the lines in myfile that contain a matching pattern (string) |
|
Display the entire contents of the file myfile |
|
Display the contents of the file myfile, one page at a time |
|
Copy the file myfile1 to myfile2 |
|
Rename the file into myfile2 |
|
Move the file myfile into the directory mydir |
|
Delete the file myfile |
|
Create a directory named mydir |
|
Change the current directory to mydir |
|
Remove the directory mydir (if empty) |
Online Tutorials
Linux Tutorials
Text Editing
Shell Scripting
Bash Shell Scripting (bash)
C Shell Scripting (csh)
Use keyword combinations such as Unix Tutorial, Linux Tutorial, Linux Text Editing, and Shell Scripting to find additional information online.
Data Transfer
Users may have a need to move data between a local system and the Campus Cluster. On Windows systems, several SSH-based clients provide functionality for file transfer (scp/sftp). The list of SSH Clients clients in the user guide indicates which clients support file transfer and remote login functionality.
scp/sftp clients are also available in two formats: GUI and CLI.
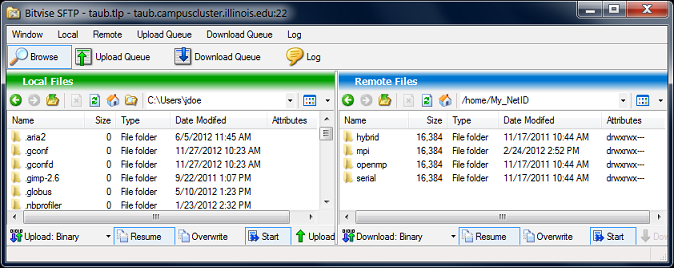
GUI Data Transfer Example
Generally, GUI-based scp/sftp clients implement a drag and drop interface (recommended for beginner users).
Bitvise Tunnelier sftp client
CLI Data Transfer Examples
The CLI examples below display scp and sftp syntax for transferring files between the Campus Cluster and a local system.
scp example:
Transferring a file on your local system to your home directory on the Campus Cluster:
my_desktop% scp local_file My_NetID@cli-dtn.researchdata.illinois.edu:~/
Transferring a file in your home directory on the Campus Cluster to your local system:
my_desktop% scp My_NetID@cli-dtn.researchdata.illinois.edu:~/remote_file ./
sftp example:
Transferring files between your local system and the Campus Cluster:
my_desktop% sftp My_NetID@cli-dtn.researchdata.illinois.edu
sftp> put local_file
sftp> get remote_file
CLI usage on Windows machines may require additional configuration steps or use of specially named commands for scp and sftp. See the SSH client’s documentation for additional CLI configuration information or usage instructions.
Text Editors
Text editors are used for editing plain text files. The Campus Cluster has two text editing programs: vi (and an improved version called vim) and nano.
vi/vim is one of the most commonly used text editors, however Campus Cluster staff recommend that new Linux users start off using nano; nano may be more similar to the way users edit text files on non-Linux based machines.
The general syntax to begin editing a file with nano is:
nano file.txt
The same syntax is used to edit a file with vim:
vi file.txt
A newer version of vim (non-default) is available and accessed via the modulefile vim (see Managing Your Environment (Modules)).
nano Text Editor Example (click to expand/collapse)
This example creates a “hello world” C program in nano.
Type the following to open a blank text file named
hello.c:[My_NetID@cc-login1 ~]$ nano hello.c
Type the program exactly as shown below in your nano text editing session.
#include

main()
{
  printf("Hello, C World!n");

/* The sleep() function causes the program  */
/* to wait 90 seconds before ending.        */
/* This line is optional.                   */
  sleep(90);

}
After entering the C program, exit the nano text editing session by holding down control (Ctrl) and X, which is indicated by a “^X” in the bottom left corner of the nano session.
Exiting a nano session after editing a text file will prompt to save the changes made to the text file. To save changes without exiting the nano session, hold down control (Ctrl) and O.
Building Applications
The GNU Compiler Collection (GCC) is available by default for compiling source code.
The general syntax to compile source code and build an application (executable) is to type the compile command followed by the source code file.
For example, to build an executable for a C program named myprogram.c the syntax would be:
gcc myprogram.c
A successful build will generate an executable (binary) file named a.out that can be executed (run) by typing:
./a.out
Additional information can be found in the Programming Environment section.
GCC Build Example (click to expand/collapse)
To build an application using the hello.c program that was created in the nano text editor example above:
Type:
[My_NetID@cc-login1 ~]$ gcc hello.c
An executable file will be created named
a.out. To verify that the file exists, type:[My_NetID@cc-login1 ~]$ ls -l a.out
Batch Job Submission
The head nodes on the Campus Cluster are a shared resource for all users. Computational use of the head nodes should be limited to compiling and building programs, and for short non-intensive runs. Users should do all production work by submitting jobs to the batch system.
To submit jobs on the Campus Cluster, users should create a job script. A job script is a plain text file that contains special lines that describe the resources needed for the batch job. Also contained in the job script are sequential commands to execute specific tasks or run a specific code.
The job script is submitted to the batch system using the sbatch command.
Job Script Creation and Submission Example (click to expand/collapse)
Job Script Creation
This example uses nano to create a job script.
Type the following to open a blank text file named
myjob.sbatch:[My_NetID@cc-logn1 ~]$ nano myjob.sbatch
Type the job script as shown below in your nano text editing session.
If you don’t know the name of the account(s) available to you, ask your technical representative or submit a support request.
#!/bin/bash
#
#SBATCH --time=00:05:00
#SBATCH --nodes=1
#SBATCH --ntasks-per-node=16
#SBATCH --job-name=myjob
#SBATCH --account=account_name   # <- replace "account_name" with an account available to you
#SBATCH --partition=secondary
#SBATCH --output=myjob.o%j
##SBATCH --error=myjob.e%j
##SBATCH --mail-user=NetID@illinois.edu     # <- replace "NetID" with your University NetID
##SBATCH --mail-type=BEGIN,END
#
# End of embedded SBATCH options
#

# Run the hello world executable (a.out)
./a.out
After entering the job script, exit the nano text editing session by holding down control (Ctrl) and X, which is indicated by a “^X” in the bottom left corner of the nano session.
Exiting a nano session after editing a text file will prompt to save the changes made to the text file. To save changes without exiting the nano session hold down control (Ctrl) and O.
Job Submission
To submit a job to the batch system using the job script created in nano above, type:
[My_NetID@cc-login1 ~]$ sbatch myjob.sbatch
A message with a job identification number similar to the one shown below is printed to the screen as confirmation that the job was successfully submitted to the batch system.
Submitted batch job 110975
Additional information regarding batch job submissions and commands can be found in the Running Jobs section of the Campus Cluster user guide.
To try other types of beginner examples (MPI, OpenMP, or Hybrid), view the README.helloworld file by typing the below on the command line:
cat /sw/cc.users/examples/README.helloworld
Batch Commands
There are a number of commands/utilities available that will report details about a batch job.
The numeric portion of the job identification (JobID) string or the NetID can be used to view details about a batch job.
Some examples of the available commands are as follows:
To display the status of all jobs in the batch system owned by you:
squeue -u My_NetID
To display details of a specific job identified by
JobID:scontrol show job JobID
To remove a queued job or delete a running job identified by
JobID:scancel JobID
Windows Linux Compatibility
There are some issues to be aware of when transitioning between Windows systems and the Campus Cluster.
Linux and Windows use different formats for line breaks in text files, which can cause problems when reading Windows Notepad edited files on the Campus Cluster. For the same reason, when reading Linux created text files in Windows, Notepad will present the file in a single line. WordPad on Windows is recommended for editing text files when transitioning between Windows systems and the Campus Cluster.
Unlike Windows and Mac OS X, Linux file and directory (folder) names are case sensitive.
Avoid spaces in file or directory names on Linux because it can cause problems. One option is to rename files with a character such as “_” or “.” in place of the spaces before transferring to the Campus Cluster. If you keep spaces in your file names, see How to Read a Filename with Spaces in Linux for how to deal with them.