Software
You can install software in spaces you have write-access to (home, projects, scratch). Project space is the recommended location to install software. Consider the following when installing any software:
Home directory disk usage quotas.
Will the software be used by multiple users in my group?
Does the desired software have dependencies/requirements?
Is the prerequisite software installed?
Installed Software
The table below shows the core software and libraries available on Nightingale. You can use module commands to add this software to your software environment.
Software |
Version |
|---|---|
2022.05 (Python 3.9.12) |
|
2.4.16 |
|
11.4.2 |
|
12.2.0 |
|
4.3.2 |
|
24.1 |
|
2022.05 (Python 3.9.12) |
|
4.2.0 |
Using Modules
Nightingale uses Environment Modules. Turn access to software on or off by loading or unloading a modulefile; this adds or removes the software’s configuration in your user environment. The table below shows the most common module commands you will use on Nightingale.
Note
Module commands are the same for all shells (Bash, tcsh, ksh, and others).
The order that module commands are executed in is important. Changes are prepended to the current user environment paths with each module load.
In the module commands below, replace
modulefile,modulefile2,oldmod, andnewmodwith the names of the modulefile(s) you are running the command on.
Command |
Description |
|---|---|
|
Lists the modules that are available. |
|
Lists the modules that are loaded in your user environment. |
|
Provides general information on what the modulefile does to your current user environment, when loaded. |
or
|
Displays (or shows) the changes that loading the modulefile will make to your current user environment. |
|
Loads a modulefile(s) into your current shell environment. |
|
Unloads a modulefile. If you unload a modulefile you had previously loaded, then the software is no longer available in your current shell environment. |
|
Unloads the oldmod and loads the newmod. This is typically used to change the version of a modulefile that you have loaded. |
|
If you have modulefiles that you want to load every time you log in, without having to use the
|
For more information on module commands, see the Environment Modules Documentation.
Using Python on Nightingale
Introduction
Anaconda and Miniconda are specilized distributions of the Python and R programing languages for scientific computing. Anaconda and Miniconda include Conda, a package and environment management system; this allows you to create numerous environmnets to suit your specific needs.
Versions
See Installed Software for the versions of Anaconda, and Miniconda installed on Nightingale.
Setting an Environment Variable
To be able to install additional python packages via Conda, you will need to set the HTTPS_PROXY environment variable.
You will need to set the “HTTPS_PROXY” environment variable every time you log in to the cluster using the following command:
export HTTPS_PROXY=http://ache-proxy.ncsa.illinois.edu:3128
To verify that this environment variable is set use the echo command to output the value of the environment variable.
echo ${HTTPS_PROXY}
Anaconda and Miniconda are installed on Nightingale. One of the main differences between Anaconda and Minconda is the number of packages: Anaconda by default installs with over 150 data science packages, and Miniconda by default installs a subset of the packages installed by default with Anaconda.
To enable (use) Anaconda or Miniconda on Nightingale, load the appropriate modulefile. Do not load both modulefiles, use either Anaconda or Miniconda.
module load anaconda3/2022.05
or
module load miniconda3/2022.05
Viewing Installed Python Packages
After enabling Python in your user environment (by loading a Anaconda or Miniconda modulefile), you can view a list of the Python packages installed with the following command:
conda list
Creating your Conda Environment
We recommend you use the locally installed Conda, so that you can install the specific packages that you need. You can have multiple environments with different packages for testing purposes.
Create your own conda environment called
my.conda_envwith the following command:conda create -n my.conda_env <package_name>
For example, to create a Conda environment that intalls python and all of its dependencies:
conda create -n my.conda_env python
To start running Python, you need to activate your Conda environment.
source activate my.conda_env
When your Conda environment is activated, your prompt should start with:
(my.conda_env)\ [username@ng-login01 ~]$
Use the following command to display all known Conda environments:
conda info -e
An asterisk (*) will appear on the line of the Conda environment that is currently active.
To make sure you have the latest version of Python in your environment, install Python using the
conda-forgechannel.conda install python --channel conda-forge
When you’re ready, exit your conda environment with the following command:
conda deactivate
You should now see your default prompt, which indicates that your conda environment has been deactivated.
Complete Example of Creating a Conda Environment
The following list of commands will create a conda environment, built around the package PyTorch, in your home directory.
export HTTPS_PROXY=http://ache-proxy.ncsa.illinois.edu:3128
cd ${HOME}
module load anaconda3/2022.05
export CONDA_PKGS_DIRS="${HOME}/.conda/pkgs"
conda create -n my.pytorch pytorch
conda info -e
source activate my.pytorch
conda info -e
conda list
Running the command conda deactivate, will deactivate the conda environment created by the above example.
Using R on Nightingale
Introduction
R is a programming language and software environment for statistical computing and graphics. R and its libraries implement a wide variety of statistical and graphical techniques, such as linear and non-linear modeling, classical statistical tests, time-series analysis, classification, and clustering.
R is easily extensible through functions and extensions. The R community is noted for its active contributions to developing R packages. R packages contain code, data, and documentation in a standardized collection format that R users can install. R and R packages are available via the Comprehensive R Archive Network (CRAN), a collection of sites that carry the R distribution(s), the contributed extensions, documentation for R, and binaries.
Versions
See Installed Software for the versions of R installed on Nightingale.
Adding R to Your Environment
You can use a modulefile to load a specific R version into your user environment.
module avail R
To load a specific version, you will need to load the corresponding module. See Using Modules for more information about modules.
Load the latest version of R available on Nightingale with the following command:
module load R
Installing Add-on Packages
Any R add-on packages not available in the system installation can be installed from the CRAN in a user-specified location. You must have write access to the location.
Installation Command Syntax
To install R packages, you only need the package name; you can also specify additional information, such as installation location and the repository.
The install R packages commands is install.packages(). Two example installations specifying Package Name, Location, and Repository are shown below.
Install the package downloaded (
package name) from the specified repository (Repository URL) into the specified location (/path/to/r_libraries):install.packages('package_name', '/path/to/r_libraries', 'Repository URL')
Install the local package (
package_name.tar.gz) into the specified location (/path/to/r_libraries), specifying no repository (repos = NULL):install.packages('package_name.tar.gz', '/path/to/r_libraries', repos = NULL)
When the installation location and repository URL are not specified, R packages are installed in a default location, and the installation process prompts you to choose from a list of repositories. R packages downloaded manually from the CRAN can be installed by specifying the local file name and omitting the repository URL (specifying NULL).
Using Rscript
You can use the rscript command to run R commands without starting an R session. As a scripting frontend for R, Rscript enables using R via shell scripts and scripting applications.
The example below shows step-by-step the commands you can run on Nightingale. In these steps, ~/Rlibs is used for the location to install your user-specific add-on packages and the tilde ~ means your home directory ($HOME).
Note
This example uses the Bash shell. The command syntax may differ when using a different shell.
Set the
HTTPS_PROXYenvironment variable (if you have not already done so):export HTTPS_PROXY=http://ache-proxy.ncsa.illinois.edu:3128
Create a directory for your R packages:
mkdir ~/Rlibs
Load the R modulefile:
module load R/4.2.0
Set the R library environment variable (
R_LIBS) to include your R package directory:export R_LIBS=~/Rlibs:$R_LIBS
Use the
install.packages()command to install your R package:Rscript -e "install.packages('RCurl', '~/Rlibs', 'https://cran.r-project.org')"
If the environment variable R_LIBS is not set and a directory is not specified with the install.packages() command, then R packages will be installed under ~/R/x86_64-unknown-linux-gnu-library by default (this R subdirectory structure is created automatically). The R_LIBS environment variable will need to be set every time when logging into Nightingale if your R package location is to be visible to an R session. You can add the following code to your ~/.bashrc file to remove the need to set the R_LIBS environment variable with every login session to Nightingale:
if [ -n $R_LIBS ]; then
      export R_LIBS=~/Rlibs:$R_LIBS
else
      export R_LIBS=~/Rlibs
fi
Warnings and Error Messages
If the name of a package is misspelled or the R package is not available in the current CRAN, an error message similar to the following will be generated:
[ng-login01 ~]$ Rscript -e "install.packages('phybase','~/Rlibs', 'http://ftp.ussg.iu.edu/CRAN')"
Warning message:
package 'phybase' is not available (for R version 3.2.2)
Searching the CRAN site for your desired R package may provide links to archived versions that are not available in the current CRAN.
In this case, the specific archived R package can be downloaded and installed from the local file using the same command but omitting the repository URL (specifying NULL).
Some R packages have dependencies that are required to be installed first, and will generate an error message similar to:
[ng-login01 ~]$ Rscript -e "install.packages('phybase_1.1.tar.gz', '~/Rlibs',  repos = NULL)"
ERROR: dependency 'ape' is not available for package 'phybase'
* removing '/home/jdoe/Rlibs/phybase'
Warning message:
In install.packages("phybase_1.1.tar.gz", repos = NULL) :
  installation of package 'phybase_1.1.tar.gz' had non-zero exit status
Installing the dependency first and then the desired R package resolves this issue.
Viewing Installed R Packages
You can use the library() command to view all your user and system-installed R packages (user-installed packages are only visible to R when the $R_LIBS environment variable is set):
[ng-login01 ~]$ Rscript -e "library()"

Packages in library '/home/jdoe/Rlibs':

R6                      Classes with reference semantics
RCurl                   General network (HTTP/FTP/...) client interface
                        for R
...
stringr                 Simple, Consistent Wrappers for Common String
                        Operations
whisker                 {{mustache}} for R, logicless templating


Packages in library '/sw/apps/R/R-4.2.0/lib64/R/library':

KernSmooth              Functions for kernel smoothing for Wand & Jones
                        (1995)
MASS                    Support Functions and Datasets for Venables and
                        Ripley's MASS
...
tools                   Tools for Package Development
utils                   The R Utils Package
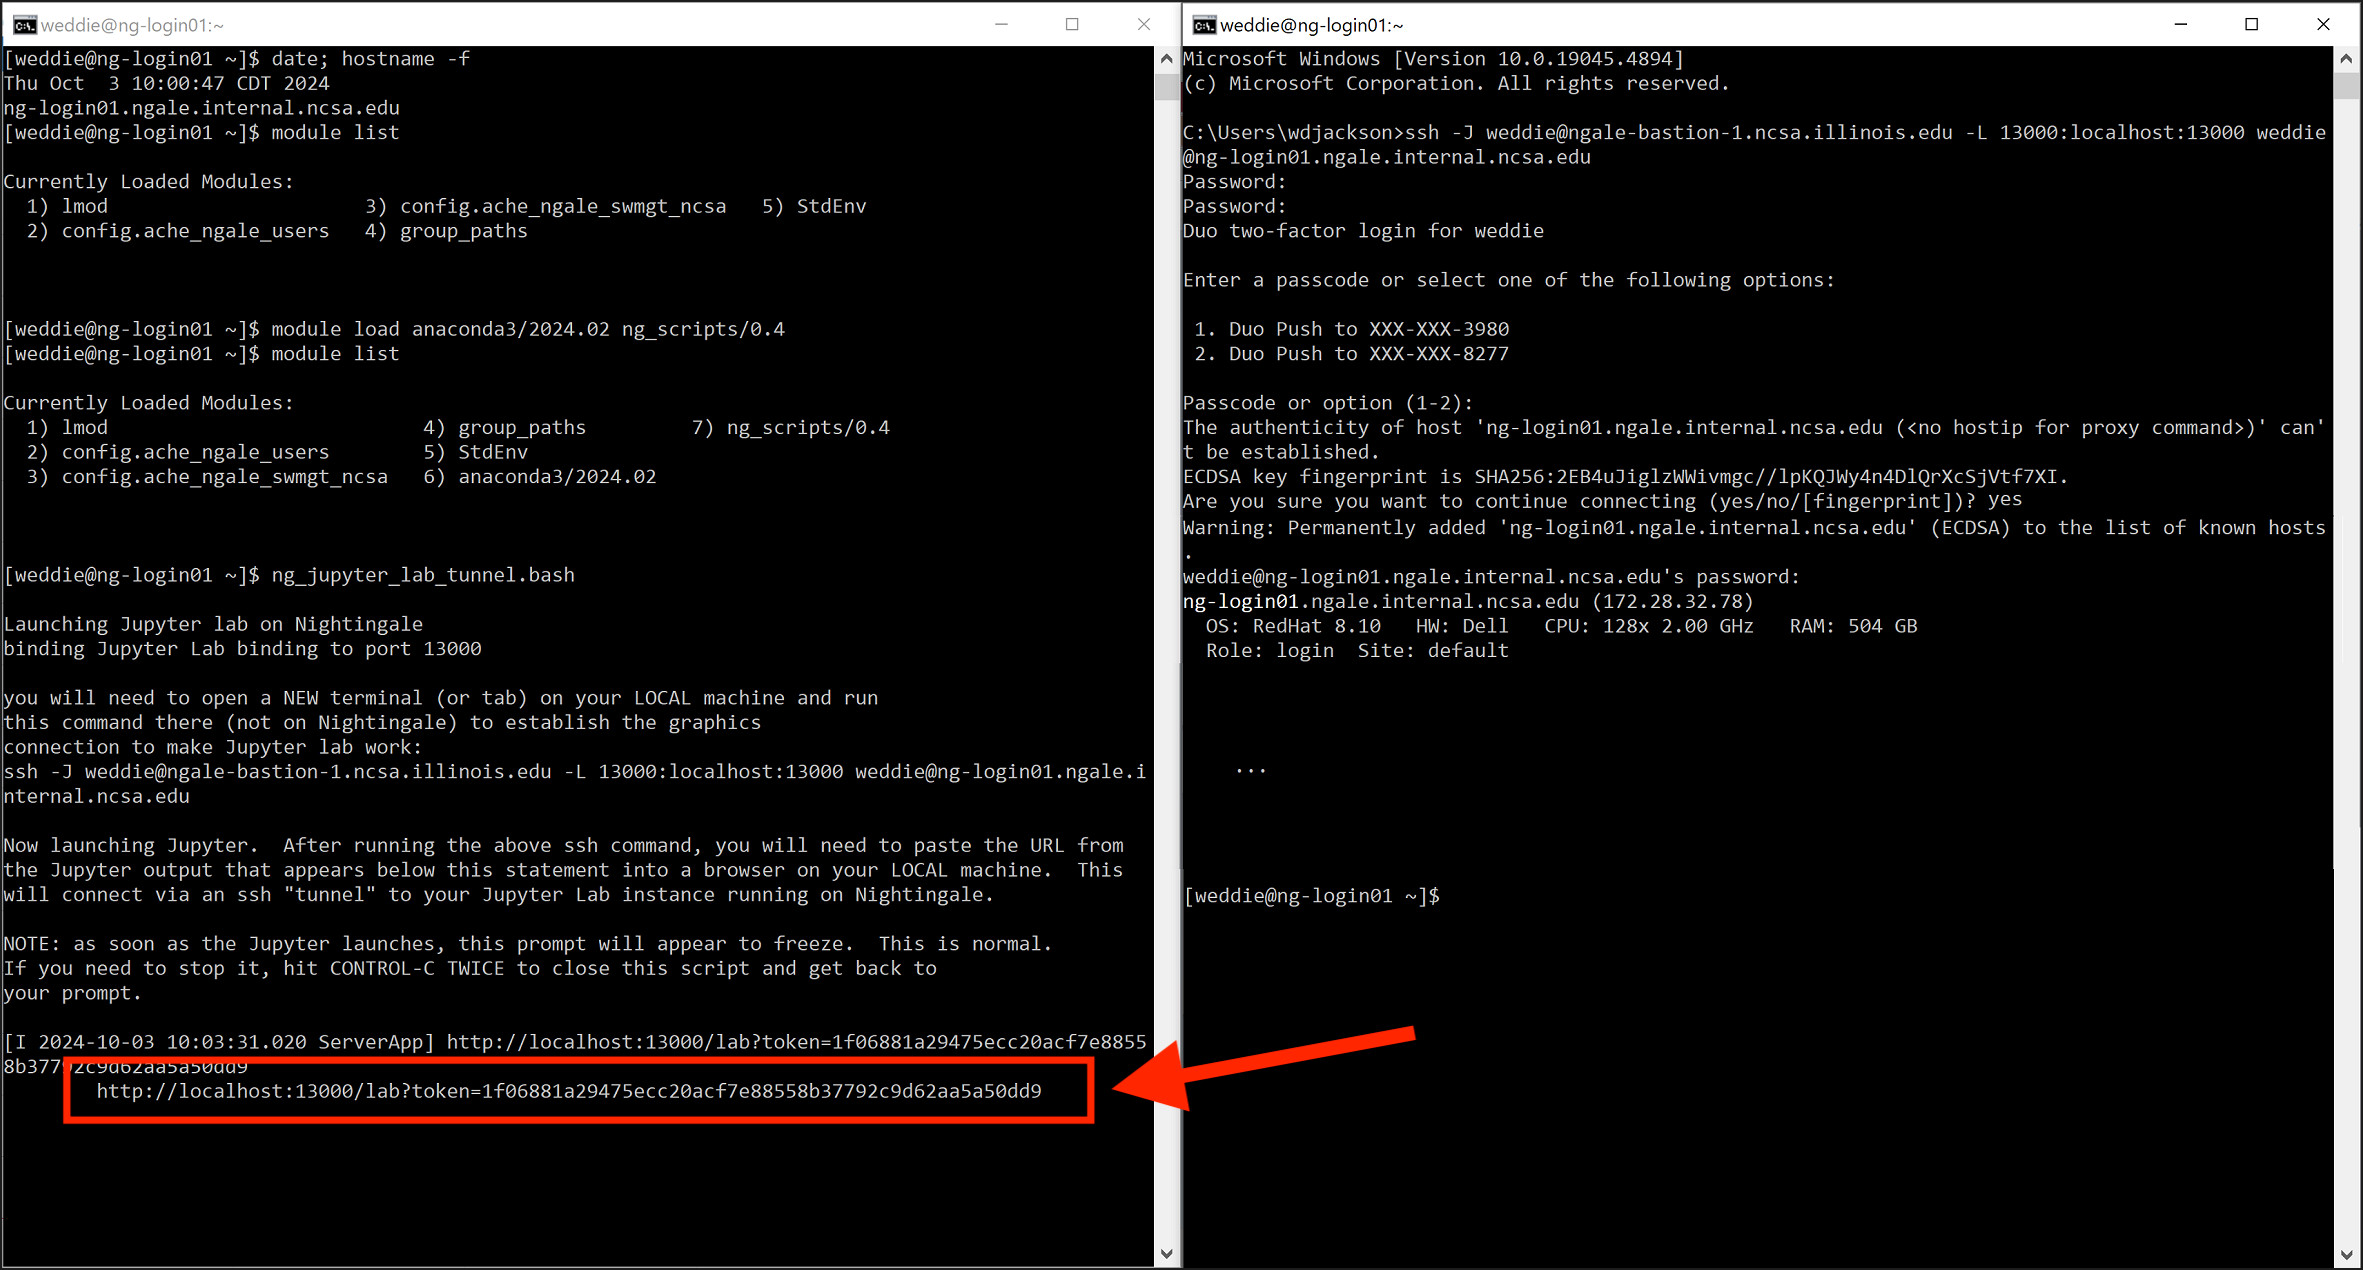
Launching a JupyterLab Session
Launch a JupyterLab session in a web browser with the following steps.
Log in to
ng-login01. (Replaceusernamewith your Nightingale username in both places.)ssh -J username@ngale-bastion-1.ncsa.illinois.edu username@ng-login01
On the login node, run the following commands:
module load anaconda3/2024.02 ng_scripts/0.4
ng_jupyter_lab_tunnel.bash
Take note of the URL at the end of the output of the
.bashcommand, you will use this URL step 4.Leave your first terminal open, and open a second terminal on your local machine. In the second terminal, run the following command and complete the login prompts. (Replace
usernamewith your Nightingale username in both places.)ssh -J username@ngale-bastion-1.ncsa.illinois.edu -L 13000:localhost:13000 username@ng-login01.ngale.internal.ncsa.edu
You may get a prompt similar to: “Are you sure you want to continue connecting (yes/no/[fingerprint])?”. Respond with
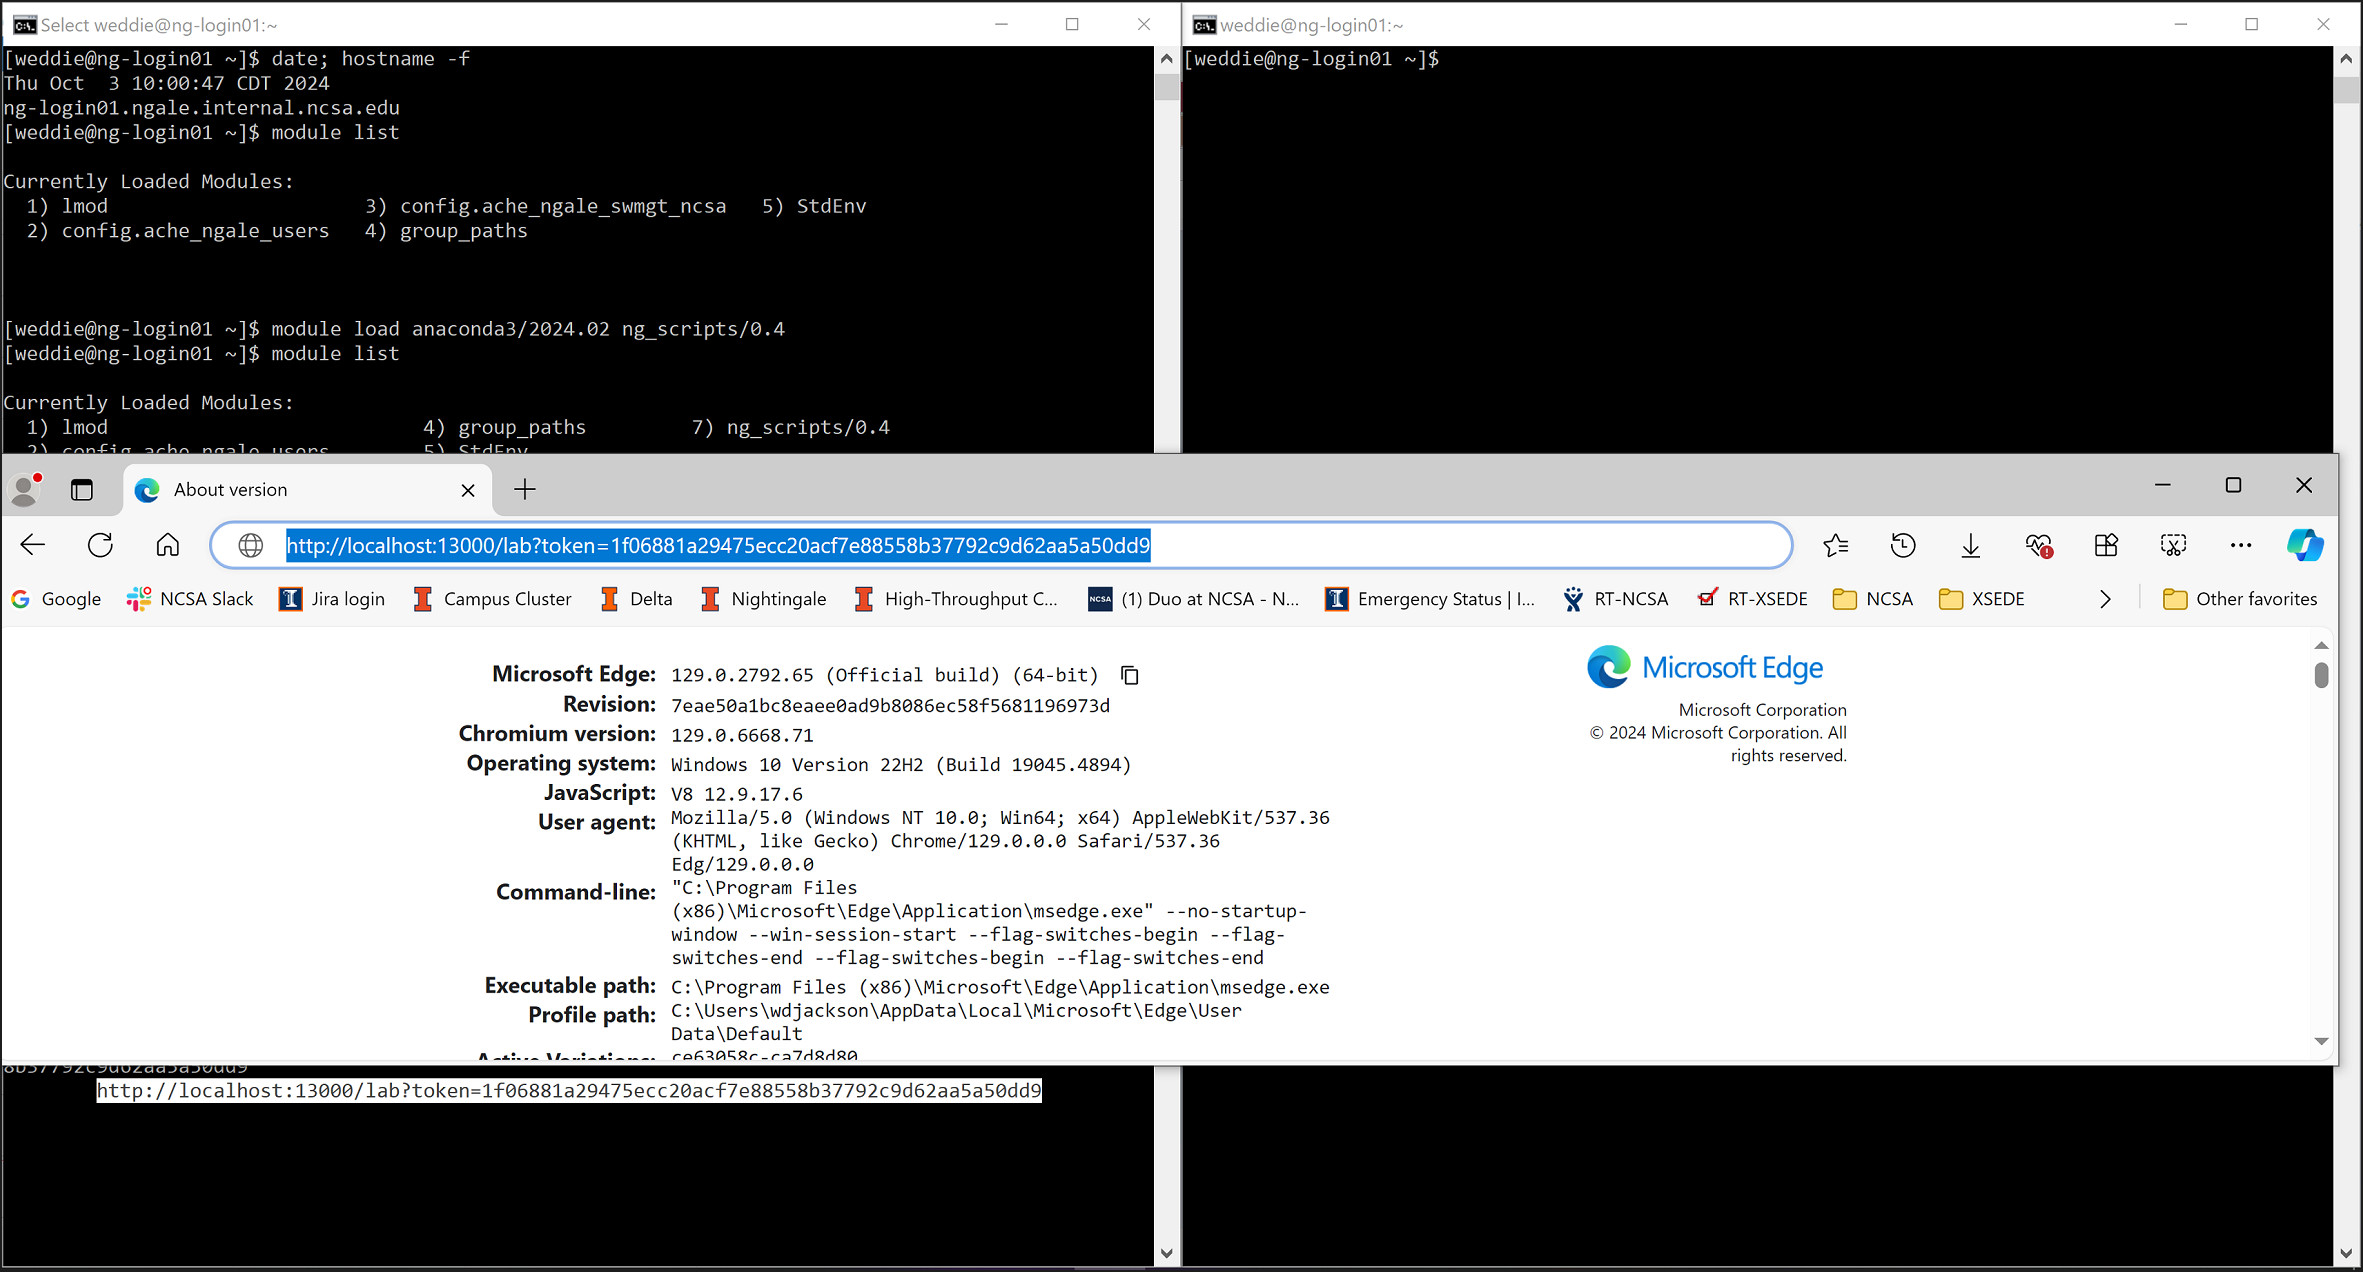
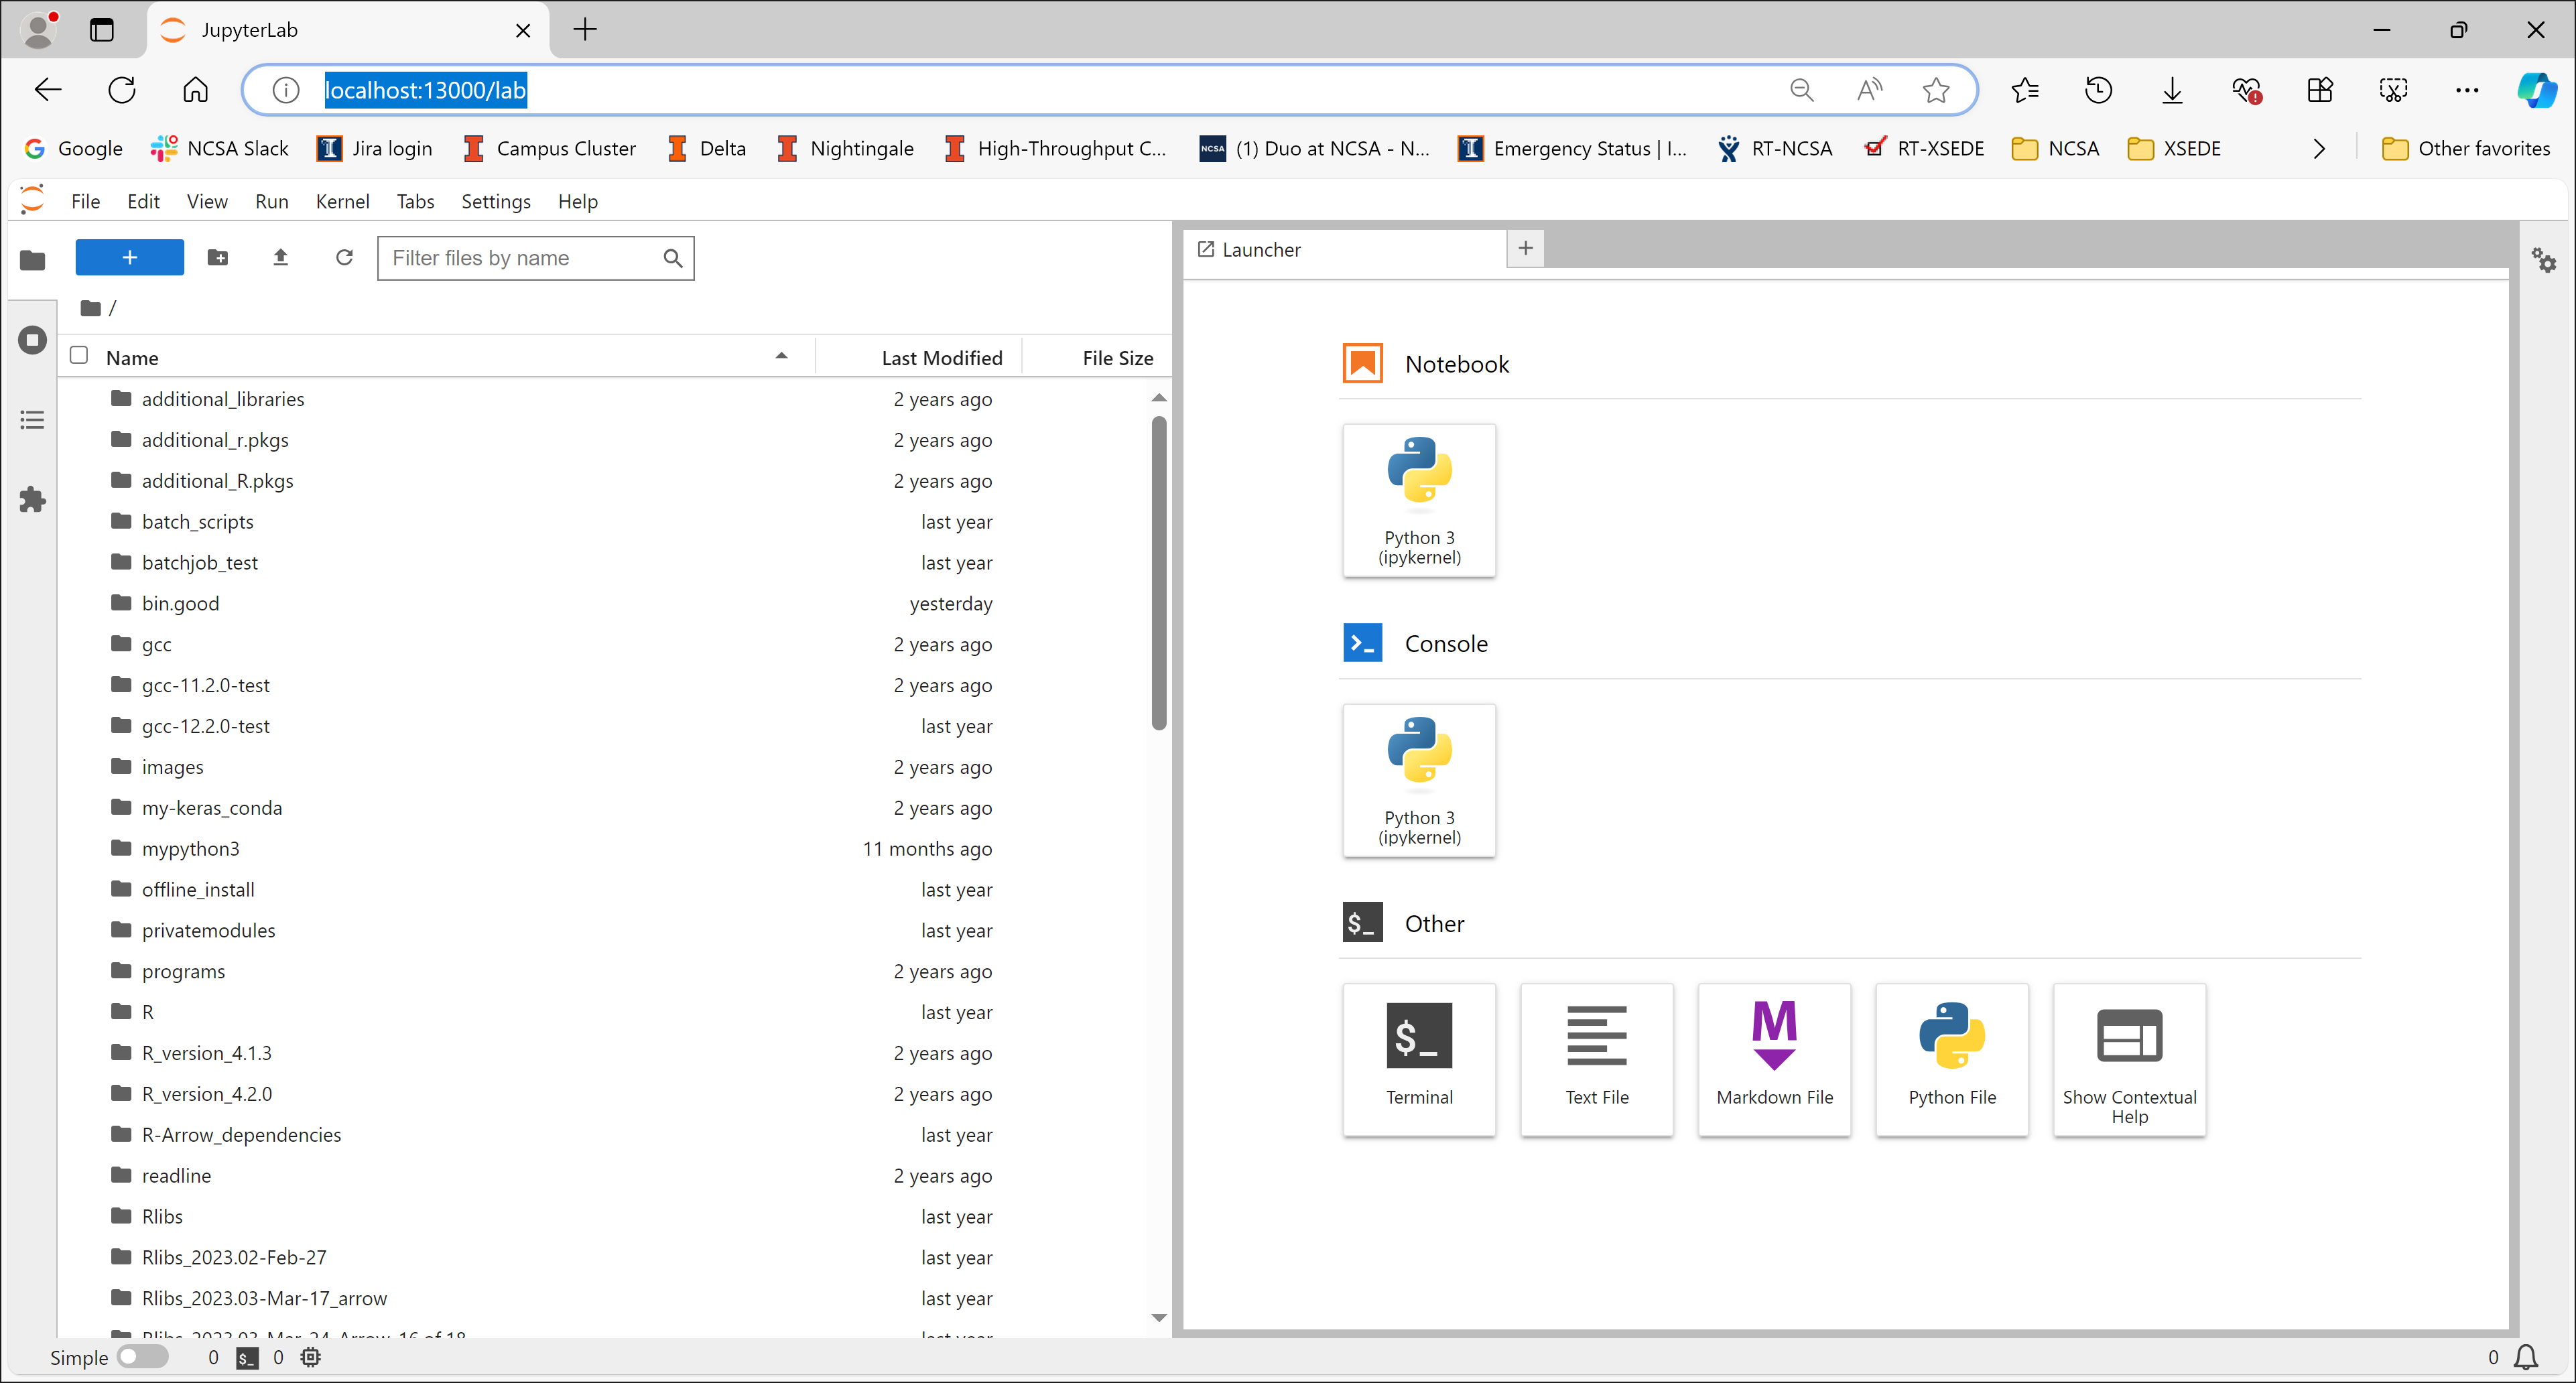
yesand complete any additional password prompts.Open a web browser on your local machine and paste the URL from step 2 into the web browser.
A JupyterLab session will launch in the web browser.