Run Jupyter on a Compute Node in VS Code
Warning
This page is under construction.
Follow the Remote SSH to Delta in VS Code instructions.
You should now be on a Delta login node, which is not recommended for running big programs; the remaining steps will get you onto a compute node.
Install the Jupyter and Python VS Code extensions, if they aren’t already installed.

From the VS Code Terminal menu, open a New Terminal.
Run the following to see the available anaconda modules:
Load the conda module that you want to use, the following example installs
python/miniforge3_cpu.Run the following command to verify Jupyter is in your path:
Select one of the following tabs to connect to a compute node using
srunorsbatch.Generate a
MYPORTnumber and copy it to a notepad (you will use it in a subsequent step).MYPORT=$(($(($RANDOM % 10000))+49152)); echo $MYPORT
Find the account name that you are going to use and copy it to a notepad. Your available accounts are listed under Project when you run the
accountscommand. Note, to use a GPU compute node, you must pick a GPU account (the account name will end in “-gpu”).Run the following
sruncommand, with these replacements:Replace
<account_name>with the account you are going to use, which you found and copied in the previous step.Replace
<MYPORT>with theMYPORTnumber that you generated in a previous step.Modify the
--partition,--time, and--memoptions and/or add other options to meet your needs.
srun --account=<account_name> --partition=cpu-interactive --time=00:30:00 --mem=32g jupyter-notebook --no-browser --port=<MYPORT> --ip=0.0.0.0
Copy the last five lines returned, beginning with “To access the notebook, …”
Complete the Connect to a remote Jupyter server instructions.
Use the first URL that you copied in the previous step as the URL of the running Jupyter Server.
Select the Python 3 kernel (recommended).
You can run
!hostnamectl, in a notebook, to verify it is running on a compute node (Static hostname value).
Create a batch script for jupyter-notebook. In the following examples, at a minimum, replace the
accountand change theoutputlog file name to a path/filename that you want to use.CPU example script (click to expand/collapse)
#!/bin/bash
#SBATCH -J Jupyter
#SBATCH --output=./log/%j.out
#SBATCH --account=bbka-delta-cpu
#SBATCH --nodes=1
#SBATCH --ntasks-per-node=1
#SBATCH --partition=cpu-interactive
#SBATCH --time=00:15:00
#SBATCH --mem=32g
#SBATCH --cpus-per-task=1
srun jupyter-notebook --no-browser --ip=0.0.0.0
GPU example script (click to expand/collapse)
#!/bin/bash
#SBATCH -J Jupyter
#SBATCH --output=./log/%j.out
#SBATCH --account=bbka-delta-gpu
#SBATCH --nodes=1
#SBATCH --ntasks-per-node=1
#SBATCH --partition=gpuA40x4-interactive   # <-or one of: gpuA100x4 gpuA40x4 gpuA100x8 gpuMI100x8
#SBATCH --time=00:15:00
#SBATCH --mem=199g
#SBATCH --cpus-per-task=1
# # ### GPU options ###
#SBATCH --gpus-per-node=1
#SBATCH --gpus-per-task=1
srun jupyter-notebook --no-browser --ip=0.0.0.0
Run
sbatchto execute your Slurm script. Replacefilenamewith the name of your script file.sbatch filename.slurm
Once the job is running, open the log file and copy the last five lines returned, beginning with “To access the notebook, …”
Complete the Connect to a remote Jupyter server instructions.
Use the first URL that you copied in the previous step as the URL of the running Jupyter Server.
Select the Python 3 kernel (recommended).
You can run
!hostnamectl, in a notebook, to verify it is running on a compute node (Static hostname value).
Run a Python Script File (.py) in a Jupyter Interactive Window
After you’ve completed the above steps to connect to Jupyter on a compute node, use the following instructions to run a Python script file (.py) in a Jupyter interactive window.
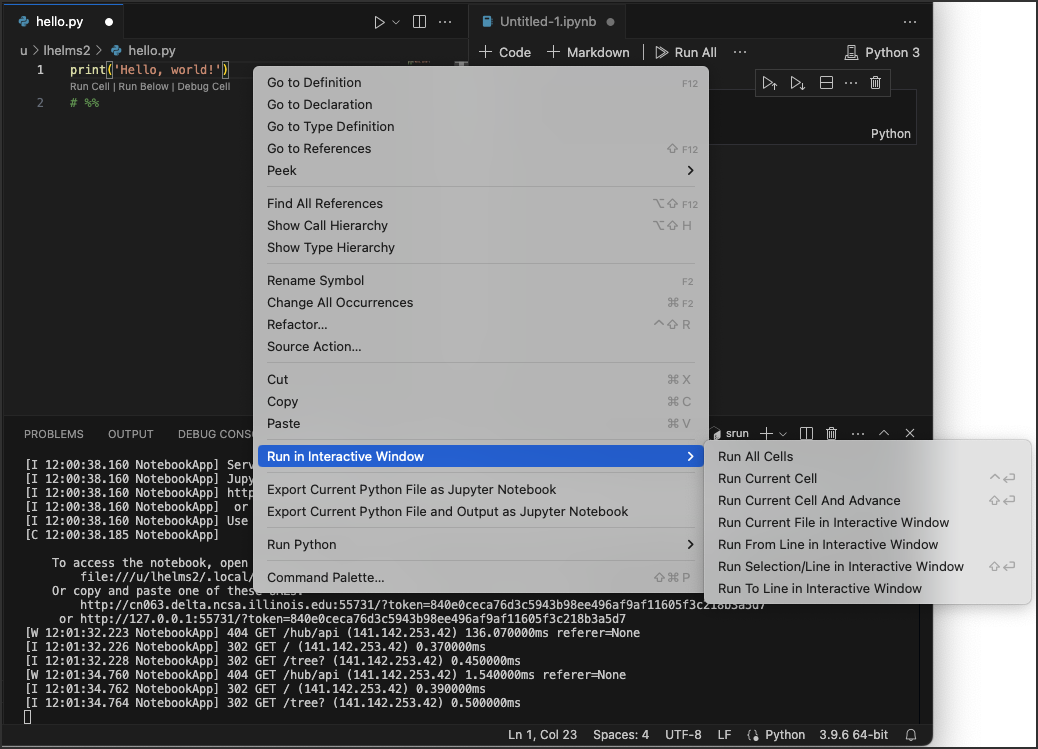
Open your Python script file in VS Code.
Adding
# %%or# In[]in your python codes splits your code into many Jupyter-like code cells. Because the Jupyter extension is installed, Run cell, Run Below, and Debug Cell will show up before# %%or# In[]for each cell.Right-click and select Run in an Interactive Window.
The interactive Jupyter window should now be linked to your .py file. Each time you click Run Cell, your code will run in the window. You may need to select or change your desired python kernel by clicking the kernel select button at the top right.
